
The Islands of Death
by King Everast from Threshold Magazine issue 33Welcome to the second instalment of “Islands of Death”. In the first instalment1 we had the introduction and backstory as well as part 1: “The Peaceful Island of Home”. In this article we shall continue the tale in parts 2 and 3. Part 2: “The Archipelago of Horrors” will give a brief overview of the archipelago as well as the various ocean encounters. Part 3: “The Primitive Land of Topaxi” will describe Topaxi Island in detail and the various encounters on it.
Enjoy – King Everast
Part 2: The Archipelago of Horrors
The Goal of Part 2
Part 2 is an overview of the entire archipelago so in that sense there isn’t an ordinary goal and mission. Try to make the players explore Topaxi before they explore any other islands as the larger plot and story will be revealed there.
1. Home
Home is a small rocky island a few hundred feet across and is dominated by the Thyatians’ trading castle. Situated in the southernmost point of the archipelago, it has now been conquered by Althores and is filled with undead. Home is described in more detail in Part 1: The Peaceful Island of “Home” released in issue #30.
2. Topaxi
Topaxi is a beautiful island covered in forest and plains. Grassy hills rise up in the centre of this large island and its two rivers flow from here. It is situated roughly north-east of Home. It used to be inhabited by primitive natives who dwelt in their village, Topax, high in the hills, near an enormous cave filled with topazes, which they occasionally mined to trade with Thyatian traders from Home. Recently though, untold horrors have been emerging from the cave and the Topaxians have fled their home and are now camping in the plains on the western edge. Meanwhile, Althores has sent some ships with some squadrons of his army and they are now conquering the eastern forests and will soon find the refugees. Topaxi will be described in more detail in Part 3: The Primitive Land of Topaxi.
3. The Island of Fire
The Island of Fire is a large island covered in scalding deserts. The main inhabitants are the sis’thik (from the Creature Catalog) and giant scorpions. In the centre of the island is the Temple of Ostegos. Ostegos is a death demon and one of the four guardians of Althores’s staff. (Which will be described in a later article.) The temple must be visited if the PCs wish to defeat Althores.
4. The Island of Water
The Island of Water is a curious place: It is a large ring of mountains with an enormous lake in the centre. The island has almost no inhabitants but in the middle of the lake is a large temple and there dwells Aquath, the second of the four guardians.
5. The Island of Earth
All creatures of this jungle island live in fear of Shazra, the dark elf, who dwells together with her hordes of magically constructed warriors within the terrifying stone temple. Shazra is the third guardian of the staff. Other than those who dwell within the temple the island is inhabited mostly by carnivorous plants and mutant animals.
Islands
of Death http://pandius.com/IslandsofDeath.jpg
map
drawn by Porg the Horse. The map is roughly 400 miles between the
northern and southern edges.
6. The Island of Air
This mountainous island, with a peak that soars above the clouds, is home to the fourth and final guardian of the staff. Takrisa is a master wyrd who dwells high up in the mountains with his elite undead legions.
The undead have long since killed off all the other residents of this island and now not even plants or animals dwell here.
7. Pirate Island
The largest of the islands in the Topaxi archipelago, this island used to be entirely devoid of human life. Recently, however, a large pirate fleet made an outpost on the northerly peninsula. The rest of the island is home to many unusual and rare creatures, animals and humanoids.
8. Demihuman Island
This is a beautiful island full of rolling hills, lush forests and towering mountains. Its only inhabitants are halflings, elves, and dwarves. It is from here that the PCs will eventually be able to muster an army to take down Althores.
9. Isle of Lechaun
This tiny yet heavily forested island is almost entirely empty. However, in the centre in a glade of beautiful trees is a tiny village full of the most mischievous creatures ever to walk on the face of Mystara: leprechauns. The untold irritation and possible great rewards arising from meeting these strange creatures, will be covered in another article.
10. Island of Gyer
A small grassy island, this small place is home to the timid Gyerians. With a population of around 40, they are by no means numerous, but they can provide some very useful information.
11. Island of Illusion
This mysterious little island seems to be a beautiful paradise, but all is not as it seems for the entire isle is wreathed in illusion. What appears to be a beautiful villa with stunning gardens holds some far darker secrets.
12. Swamp Island
This manky, smelly island is little more than a mangrove swamp, jutting out of the ocean. Filled with swamp denizens, the forbidding island even has rumours about a terrifying hydra!
13. Isle of Dermion
This is a small hilly island with a vast city in the centre of it. The elephant men or pachydermions live here. These creatures may look odd, but they are actually some of the cleverest creatures in Mystara.
14. Island of Doom
This Island is dominated by an enormous volcano that continuously sends smoke high into the air. The island is inhabited by… Well, I wouldn’t want to spoil the surprise.
Ocean Encounters
1. Sea Giant Maelstrom
At this point in the ocean there are 7 sea giants stirring up the water and making it seem as if there is a huge whirlpool. The moment the boat comes within 300 yards, the giants attack.
Sea Giants: AC 0; HD 12; hp 60; MV 120' (40'); #AT 1 weapon or special; D 4–40 or wave attack; Save F12; ML 10; Int 12; AL C; XP 2,125
They have no treasure.
Image: Sea giant http://pandius.com/seagiant01.png
Sea giant on killer whale, composition by Senarch (https://www.deviantart.com/senarch/gallery)
2. Abode of the Storm Giant
There is a fierce thunderstorm with a 500 yard radius around this site, and should the characters sail into the storm, they come to a site of a large underwater battle. The sea giants who serve Althores have been sent to destroy the resident storm giant. Realising what was happening, the storm giant summoned some good ocean creatures to assist, and they are currently in battle. The storm giant has 10 giant crabs, 1 sperm whale which he rides, 4 narwhals, and 12 dolphins. Opposing him are 15 sea giants each riding a killer whale.
Storm Giant: AC 2; HD 15; hp 70; MV 150' (50'); #AT 1 + special; D 8–48 + storm; Save F15; ML 10; Int 18; AL L; XP 3,250
10 Giant Crabs: AC 2; HD 3; hp 14; MV 60' (20'); #AT 2 Pincers; D 2–12; Save F2; ML 7; Int 2; AL N; XP 35
Sperm Whale: AC 6; HD 36; hp 180; MV 180' (60); #AT 1 bite; D 3–60; Save F15; ML 7; Int 2; AL N; XP 12,000
4 Narwhals: AC 7; HD 12; hp 60; MV 180' (60'); #AT 1 horn; D 2–12; Save F12; ML 8; Int 4; AL L; XP 1,100
12 Dolphins: AC 5; HD 3; hp 15; MV 180' (60'); #AT 1 butt; D 2–8; Save D6; ML 10; Int 15; AL L; XP 50
15 Sea Giants: AC 0; HD 12; hp 60; MV 120' (40'); #AT 1 weapon or special; D 4–40 or wave attack; Save F12; ML 10; Int 12; AL C; XP 2,125
15 Killer Whales: AC 6; HD 6; hp 30; MV 240' (80'); #AT 1 bite; D 2–20; Save F3; ML 10; Int 2; AL N; XP 275
The battle will be victorious for the sea giants if the players do not help, and if ever the players come here again then they will be attacked by the remaining 11 giants and 13 killer whales. If the players do help, then they will get the friendship and alliance of the storm giant (who knows the true name of the Island of Doom – see appendix). The storm giant will also give them 5 potions of water breathing.
Map:
Island of Topaxi http://pandius.com/Topaxi.jpg
Caption:
Island of Topaxi, map drawn by Porg the Horse. The Island of Topaxi
is 70 miles between encounters 3 and 5. And is roughly 85 between
encounter 3 and the west coast, so the entire map is 130 miles
between the east and west borders.
Part 3: The Primitive Land of Topaxi
The Goal of Part 3
Visiting Topaxi is a vital part of the overall adventure, following directly on from the players’ visit to Home, with only the ocean encounters with the sea giant and storm giant sensibly coming between the two.
Topaxi is currently under attack by Althores’s armies. Hundreds of his humanoids are waging war against the various natives. His goblins, orcs, gnolls, bugbears, and kobolds must be defeated to save the natives, who in return will tell of an unspoken horror that has infiltrated their topaz mines from the deep dark depths. The heroes must then penetrate the expansive cave system to defeat the creatures that lie within and find an ancient artefact of incredible power: the Topaz Sphere. This is necessary to lead them to the City of the Mermen and eventually The Isle of Doom, where Althores is building up his armies.
Overview of Topaxi
Topaxi is a fair-sized island consisting of rolling hills and deep forests. The vast forests on the eastern side of Topaxi have many small villages dotted around, though most are now abandoned due to the army of orcs. At the eastern tip of Topaxi is a large army camp consisting of many hundreds of humanoids. The western half of Topaxi is mostly grassy hills at the coast with tall mountains at the centre. The village of Topax, located near the entrance to the topaz mines, is based around the source of a river. Many refugees from the east have fled to Topax and the other villages in the hills. For wandering monsters use the Expert set charts.
Location Areas
In this section of the adventure the party will wander around the island of Topaxi, hopefully save the natives from Scretonas’s armies, and eventually make their way to the topaz mines where the climax of this part occurs.
Map: Village
http://pandius.com/Village.jpg
1. Ant Infestation
At this point in the southern tip of Topaxi there is a small village of 7 huts. The area is burnt and the huts are ruined as the area was targeted by one of the first raids by Althores’s armies. Many skeletons lie sprawled around the area. The moment the players enter the village they are attacked by giant ants. There are 2 per player.
Giant Ants: AC 3; HD 4; hp 20 each; MV 180' (60'); #AT 1 bite; D 2–12; Save F2; ML 12; Int 2; AL N; XP 125
The rest of the village is deserted except for one hut where another 5 giant ants dwell guarding their treasure.
Giant Ants: AC 3; HD 4; hp 30 each; MV 180' (60'); #AT 1 bite; D 2–12; Save F2; ML 12; Int 2; AL N; XP 125; Treasure: 700 cp, 500 sp, 100 gp, 3 golden nuggets worth 50 gp each.
2. Arachnophobia
This village is very similar to Encounter No. 1, and is also burnt out and ruined. There are only bones of the primitive peoples who used to dwell here left behind. The village is inhabited by 11 giant black widow spiders. They have not been here long and so there are very few webs.
Image: Black widow http://pandius.com/GiantBlackWidow.png
Giant black widow, original drawing by Jeffrey Kosh (https://jeffreykosh.wixsite.com/jeffreykoshgraphics/home).
Giant Black Widows: AC 6; HD 3; hp 13 each; MV 60' (20'); #AT 1 bite; D 2–12 + poison; Save F2; ML 8; Int 2; AL N; XP 50; Treasure: 4 topazes worth 60 gp each.
3. The Humanoid Army
At the eastern tip of Topaxi there is a vast humanoid army entrenched. They have made a large camp on the peninsula. There is a harbour and then there are a large number of crude huts and tents.
The enormous number of goblins, orcs and the like in the area make this a very difficult encounter to survive if the players just charge in waving weapons. They will certainly have to flee; otherwise they are likely to die.
Map:
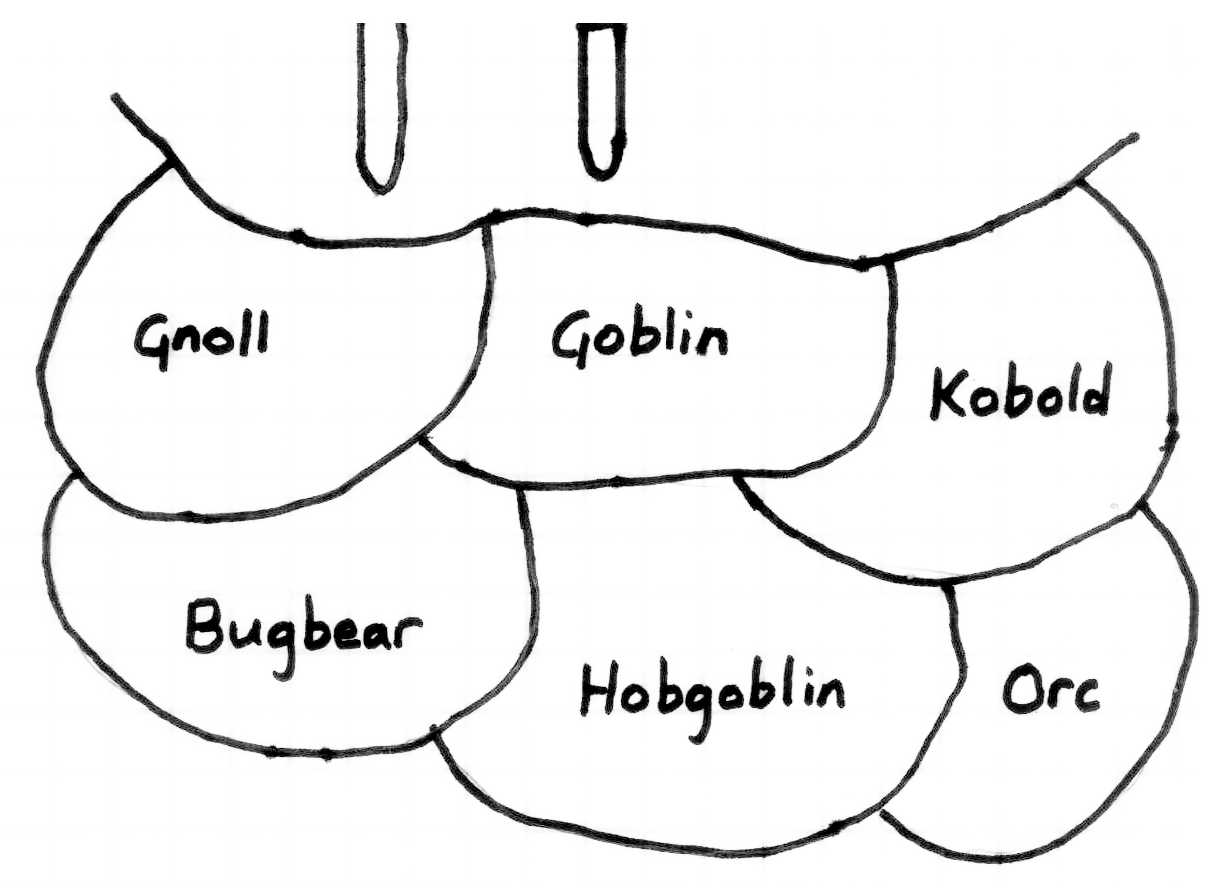
Humanoid Camp http://pandius.com/Evilcamp.jpg
There
are two enormous war galleys moored in the harbour and 6 separate
campsites with multiple huts and tents at each. The six campsites
break up the different races and are designated to goblins,
orcs,
kobolds,
gnolls,
bugbears,
and hobgoblins.
Each group has a couple of hundred able-bodied soldiers and some
servants and cooks.
The goblin campsite is inhabited by 410 soldiers and 34 servants and cooks.
The orc campsite has 394 warriors and 29 slaves and cooks.
The kobold campsite has 529 soldiers and 42 slaves and cooks.
The hobgoblin campsite has some 320 soldiers and 22 slaves and cooks.
The gnoll camp has 213 warriors and 25 servants and cooks.
The bugbear camp has just 153 warriors but 51 human slaves and 10 cooks.
Usually forces such as these would fight between themselves, but instead they are very loyal to their commander. Even so, there is still a high possibility of fights breaking out due to racial differences, and if one starts it will be hard to get under control.
The commanders of each force are just ordinary humanoid chiefs.
The supreme commander, however, is none other than Skretonas, who is being given a chance to redeem himself.
The day the party lands on the island, the army will begin to march west, and on the fourth day will catch up with the Topaxi natives at encounter 5.
A token force of an additional 20 orcs will remain behind to guard the ships.
War Machine Statistics are as follows:
BFR: 88
Class: Good
20 % of the force is mounted: all goblins ride dire wolves.
20% of the force can use missile fire: all the kobolds are armed with slings and an assortment of other races use bows and crossbows.
1% or more of the force is equipped with magical abilities: a selection of creatures have weak magical weapons.
The force has an average movement rate of 100' per turn.
BR: 123
The force has a total of 2,020 soldiers, and 213 servants, slaves, and cooks.
For treasure, just roll for each race’s appropriate lair and individual’s treasure.
The party would be foolish to attack this place until the army has vacated as it would be suicidal. After the army has left there will only be 21 orcs in the camp. All the treasure except the orcs’ personal loot will have been taken. The chief’s scores are in brackets.
Orcs: AC 6 (4); HD 1; hp 7 each (8); MV 120' (40'); #AT 1 sword or 1 short bow(1 sword + 1); D 1–8 or 1–6 (2–9); Save F1; ML 8; Int 7; AL C; XP 10; Treasure: 20 cp each (24 gp).
Image: Island orc http://pandius.com/IslandOrc.png
Original drawing by Jeffrey Kosh (https://jeffreykosh.wixsite.com/jeffreykoshgraphics/home).
4. Abandoned Village
This village is abandoned and empty, and its inhabitants long since gone. All have fled since the army landed on the island. Its layout is the same as 1 and 2.
5. The Last Defense
At this point of the island the remaining villagers have gathered in a stockaded encampment in a valley. The place is steep-sided and the mountains either side soar up to 3,000 feet.
Some 7,000 villagers reside in this small stockade in close-packed tents and huts. Of them, only 2,700 of the men can fight and only 800 have decent training. The rest are women and children.
This is the location that the army from Encounter 3 is heading to, and if the PCs are not here by the fourth day, or have not weakened or destroyed the army in some way, the villagers will be slaughtered. If the players do arrive, run the battle with war machine.
War machine statistics are as follows:
BFR: 48
Class: Below Average
20% or more of the force can use missile fire.
1% or more of the force is equipped with magical abilities.
The force has an average movement rate of 100' per turn.
BR: 62
One of the largest goals of this section of the adventure is to save these villagers, and if the players manage to do so then be sure to give them a substantial XP boost!
Map:
Topax http://pandius.com/Topax.jpg
6. The Ruined Village of Topax
This village is another abandoned village but, unlike the previous ones, it used to have stone buildings. However, these lovely stone buildings are now burnt to the ground with some stones melted and others cracked and smashed.
There is not a living thing in the vicinity, but the party will find many scorched bodies. The entire place has been picked clean and now there are only a few copper pieces.
The entrance to the topaz caves is found one mile from the village.
Dungeon Encounters
The dungeon is actually a series of caves. The first area of caves is the “Topaz Mine”. The mines used to have walls covered in the gleaming gems, but now the ones near the entrance have been stripped. The only ones left are the ones at the far end of the cave system. The miners were mining a section of wall and then the people broke open a dangerous new cave system.
Traps
A series of traps occur at various points throughout the dungeon and for simplicity’s sake I will have just one description of each. Thus at any point marked A on the map refer to trap A described below.
All traps were created by the goblins in Encounter 5.
A At this point in the passage, the ceiling of the cave is incredibly weak and the loud footfalls of the characters trigger a roof collapse, which falls down on the first few characters, dealing 2–20 points of damage per character. This trap can be prevented if the characters are trying to be extra quiet and not talking loudly to each other, or if a dwarf is near the front they will notice it immediately. If the trap is triggered the passageway becomes impassable.
B Here there is a pit 20-feet deep filling the passage. It is not covered and if the party has lights they will automatically notice it. Otherwise the front character must make a dexterity check at -5 to avoid falling down. If the front character has infravision they must still make a dexterity check, but with no minus. The pit is 10-feet across and the party must decide how to cross. Falling down the pit will make the player take 2–12 points of damage. When the party arrive at the pit, roll 1 dice. On a roll of 1–4 the pit is ordinary, but if you roll 5 or 6 the pit is spiked, causing a falling player to take 2–24 points of damage.
C This is another pit, but this time concealed in the floor of the tunnel. The front two characters will automatically fall down into the pit and the pit is identical to B. Only a dwarf may be able to identify this pit, and only if they are one of the front two characters.
D This is a typical crossbow trap. Two crossbows concealed in the wall will trigger on the party touching the tripwire. The lead character must save vs. wands or activate them, causing 2–12 points of damage.
E At the dead end here there is a lever and if the party pulls it iron bars drop from the ceiling, trapping them. The lever will not lift the bars and is then useless. The only way to escape is to push them up using a combined character strength of 60.
F This trap is by far the most devious of all. The section of tunnel this is located in is covered in greenery on either side. The moment the first member walks into this section they step on a pressure plate concealed in the rocky floor. The moment they do so, spears slide out from underneath the greenery and fill the narrow tunnel, skewering them. The player will be allowed a dexterity check at -4 and if they succeed they avoid the worst of it, only taking 5d10 points of damage. Otherwise the player dies no matter what happens. The spears then slide back into the wall and leave the body on the ground. The spears can be activated multiple times so the players must remember to not step on the pressure plate each time they pass this way.
Map:
Topaz Mines http://pandius.com/Topasmines.jpg
1. Topaz Mines
You step into the entrance of the passage and look around. Ahead is a natural cave around 7' tall and 10' wide. Multiple passageways branch off in both directions. On the rocky uneven floor you see a couple of skeletons lying on the ground. They are long dead and clothed in rags and hold picks. Ahead there is a large pile of rubble on the floor and more broken picks. The walls are uneven and here and there are small gleams of yellow: the remains of the once large numbers of topazes.
These expansive tunnels are filled with rubble and broken picks. The walls have mostly been cleared of topazes but there are still small gems here and there. Nearer the end there are far more topazes and some quite large ones. The area is devoid of life and seems to be abandoned. As the dungeon master you should do your best to make it seem spooky and wrongly silent.
2. Break Through
At some point the roof of this passage collapsed and was obviously cleared away. The collapse must have opened up a new passage from which a horrid stench emanates and the dark entrance emits an air of foreboding.
At this point in the passage the roof has collapsed and then has been cleared away to some extent, and there is a way through to dark caves where, seemingly, there are no topazes. This is the start of the evil caves, where danger came through and destroyed the village of Topax.
3. The Cavern of Death
The passage widens and grows in height. The cavern you enter is huge, at least 50' high, and wide too. Many bones litter the floor among large stalactites. A couple of bodies even look fairly fresh. You lean forward to look closer when suddenly an eye flicks open on one of the stalactites. It suddenly shoots a large tentacle towards you and opens a mouth revealing long rows of jagged teeth.
This is a large cavern about 60 feet high and filled with jagged stalactites and stalagmites. Carefully concealed among the stalactites are 4 ropers. These dreaded creatures have skin that looks like rock and with their tall pointed shapes they look just like the rocks at first glance.
Ropers: AC 0; HD 12; hp 53, 64, 71 and 82; MV 30' (10'); #AT 1 bite/6 strands; D 5–30/weakness; Save F10; ML 10; Int 4; AL C; XP 3,875; Treasure: If the characters open up the stomachs for treasure they will find 20 gems worth 200 gp each.
A roper is a long (or tall) blob-like creature that has one eye, with a mouth beneath it, and six long tentacles along the body. Ropers usually live in rocky caverns where they can take the shape of tall rocks or stalagmites, but they may occasionally be found in woods, imitating trees. Ropers eat anything that moves, but they prefer humans and humanoids. Each tentacle can shoot out 60 feet to grab prey. The touch of a roper’s strand causes weakness, reducing the victim’s strength by half for 3 turns (no saving throw). The strand wraps tightly around the prey, pulling the victim toward its mouth, but only the bite causes damage. Characters can cut a strand only if a single blow from an edged, magical weapon inflicts 5 or more points of damage. Such a blow makes that strand useless, but the damage does not count against the monster’s hit points. Damaged strands grow back in 24 hours. Ropers are immune to all first, second, and third level spells. They take no damage from cold or lightning, and are unaffected by normal and silver weapons. Characters may occasionally find treasure in ropers’ stomachs.
At the back of the cavern lies a large chest. This chest is actually a polymar.
Polymar: AC 9; HD 10; hp 55; MV 60' (20'); #AT 3 blows; D 1–6; Save F5; ML 10; Int 5; AL C; XP 1,750
The polymar is an intelligent creature that can change its shape. It can look like any creature with 10 hit dice or less, or any object no larger than 100 cubic feet (10'x10'x1', for example). The polymar gains no special abilities when it changes. This change ability is physical, not magical. Thus a detect magic spell will not detect the polymar. The change, however, is not perfect. Characters, including NPCs, have the same chance to detect the polymar as they do to find secret doors. Thus elves are more likely to notice polymars than other character classes. If the polymar is not detected before it attacks, it will attack with surprise.
Behind the polymar there lies a very narrow tunnel just 3' tall and 5' wide. The characters will have to crawl or shimmy if they want to reach the other side.
There is one other exit near the north wall of the cavern.
4. Room of Topaz
When the players enter this room they feel a great sense of peace fall over them. The walls of the room are covered in gleaming gems, all of them topazes, and on a pedestal in the centre is a gleaming crystal ball entirely made of topaz. The smooth circular object glows with an eerie light.
This gem is a magical crystal ball of seeing but it has special powers, see appendix.
The only other thing in this room are the topazes. There are vast numbers of gemstones here and the player characters may chip some from the walls; each is worth 1,000 gp. However the sound of the player characters chipping gemstones will attract the goblins from 5. When a PC starts chipping their 6th gemstone off the wall, the goblins will hear and creep into the cavern. If the goblins are not killed one of them will blast their horn of earthquakes and bring down the roof. If that happens any PCs still in the room will have to make a Dexterity check at minus 3 or be crushed to death; if they succeed, then they escape before the cavern collapses. If they have already killed the goblins, make up some other way to stop them from getting as many topazes as they want.
5. Goblins of Magic
This room is a bare stone room with torches lighting up the walls. In one corner there is a door leading off to a sleeping chamber, and in the centre of this room there is a table around which sit four goblins. These 4 goblins have long considered themselves rulers of Topaxi and each has worked hard on their own respective fields. However, they are not at all pleased with Althores, who wishes to take over their island, and so they drove out the villagers from Topax, and during the distraction on both sides, stole the item key to locating the hidden island where Althores makes his home. Someday they plan to conquer it. However, they hate humans more than Althores and on no account would they agree to deal with them, nor would they even give out information. The goblins are called Grygash, Goltrar, Greegree, and Gadro.
Image: Grygash, original drawing by Jeffrey Kosh http://pandius.com/Grygash_Fighter.png (https://jeffreykosh.wixsite.com/jeffreykoshgraphics/home).
Grygash – Goblin Fighter:
AC 1; Lvl 15; hp 67; MV 60' (20'); #AT 1 Sword+3 + fire damage; D 4–11 + 1–4; Save F15; ML 11; Int 8; AL C; XP 2,700
He wears plate armour and has a shield +1. He wields a normal sword +3 which flames on command.
Image: Goltrar http://pandius.com/Goltrar_Wicca.png , original drawing by Jeffrey Kosh (https://jeffreykosh.wixsite.com/jeffreykoshgraphics/home).
Goltrar – Goblin Wicca:
AC 6; Lvl 15; hp 24; MV 120' (40'); #AT 1 dagger/spell; D 2–5/special; Save MU15; ML 11; Int 17; AL C; XP 9,000
He carries a dagger +1 and a ring of protection +3. He also uses his spells. 1St: 5, 2nd: 4, 3rd: 4, 4th: 4, 5th: 3, 6th: 2, 7th: 1.
Spellbook
1st: Sleep, darkness, magic missile, ventriloquism, hold portal
2nd: Web, levitate, invisibility, detect invisible
3rd: Fireball x2, haste, dispel magic
4th: Curse, wall of fire, confusion, polymorph oOthers
5th: Animate dead, cloudkill, conjure elemental
6th: Flesh to stone, disintegrate
7th: Reverse gravity
Image: Greegree http://pandius.com/Greegree_Shaman.png original drawing by Jeffrey Kosh (https://jeffreykosh.wixsite.com/jeffreykoshgraphics/home).
Greegree – Goblin Shaman:
AC 2; Lvl 15; hp 38; MV 90' (30'); #AT 1 staff; D 2–12; Save C15; ML 10; Int 13; AL C; XP 9,000
He wields a staff of striking with 30 charges and wears chain armour +3. He also has spells. 1St: 6, 2nd: 5, 3rd: 5, 4th: 3, 5th: 3, 6th: 3.
Spells
1st: Cure light wounds x3, cause light wounds x2, fear
2nd: Bless, blight, hold person x2, snake charm
3rd: Continual darkness, cause disease, curse x2, remove curse
4th: Animate dead, cure serious wounds x2
5th: Cure critical wounds, raise dead, finger of death
6th: Cureall x2, barrier
Image: Gadro, http://pandius.com/Gadro_Thief.png original drawing by Jeffrey Kosh (https://jeffreykosh.wixsite.com/jeffreykoshgraphics/home).
Gadro – Goblin Thief:
AC 3; Lvl 15; hp 42; MV 120' (40'); #AT 1 sword +1; D 2–9; Save T15; ML 9; Int 11; AL C; XP 2,700
He has a sword +1 and leather armour +4 and a horn of earthquakes with five charges.
They have no treasure as the topaz room counts as their treasure, and they guard it vigorously along with the ropers, who dislike goblin meat so do not attack them (in return the goblins give them any prisoners they come across), and the polymar, an ally. The side rooms just contain a basic bedroom.
Ending the Adventure
The ideal end to the adventure would be for the army to be defeated and the Topaz Ball to be found. It is possible to complete this stage by just finding the Topaz Ball, but if that happens and the villagers are butchered the party will have lost valuable allies and Althores will be stronger when they do meet him. Part 3 should come out hopefully in the next 6 months to a year. Hope you enjoyed!
King Everast
Appendix: The Magic of Topaxi
The Topaz Ball
This mysterious item has the full functionality of an ordinary magical crystal ball, but additionally it can be used to break the illusion around the Island of Doom. It has a special power that upon finding the true name of a person or place – a name which only the Immortals know – it will shoot out a beam of light in the direction of the person or place; when you are close enough it breaks any and all enchantments around them. It is not to be used lightly as it is very difficult to find a true name and the Immortals will not give them out freely. However, there are a few people in this archipelago who do know the true name of the island. The party will just have to find one and convince them to part with the knowledge. The search should not be easy.
The Horn of Earthquakes
When blown, this horn recreates the effect of the cleric earthquake spell. Each use drains one charge.
1Published
in THRESHOLD Magazine
issue #30 http://pandius.com/Threshold_30.pdf#129
and here in the Vaults The
Islands of Death (pandius.com)