
The Islands of Death
by King Everast from Threshold Magazine issue 30
[Image:
Island]
http://pandius.com/Senarch_an_island_dominated_by_a_fortress_which_occupies_almost_241d451d-70d3-45bb-b09c-308cc892b9f0.png
Caption:
Island, done by Midjourney at Senarch’s prompt
Introduction
The Island of Home is a peaceful place, where merchants live lives of prosperity – or is it? Death has taken hold of the trading castle that dominates Home; no one has been heard from in months; and adventurers previously sent there have not returned. A formerly profitable trading business, getting much income for Thyatis, has seemingly been ruined. What is going on?
In this adventure, the heroes must journey to Home, but all is not as it seems, and before long they realise they have stumbled into something far bigger than they could have imagined – no less than the destruction of the world. And there is a high chance of it happening!
The Islands of Death is a Companion-level adventure, where the party must penetrate deep into the Topaxi Archipelago, or as it will become known, the Islands of Death. They have an awe-inspiring foe, the mighty and terrible Althores, the King of Fire Giants.
Good luck in your explorations!
Needed For Play
The Basic, Expert, Companion and Master sets or, alternatively, the Rules Cyclopedia. It is also helpful to have the Creature Catalog, but I will include brief descriptions of the monsters used from it.
I also ask you to download Cab Davidson’s excellent Necromancer character class available from the Vaults of Pandius: http://pandius.com/necrospl.html
Levels
I have not been able to decide on the levels or number of PCs because all parties are different, so I would suggest you read it through, compare it to other adventures you have run, and then decide for yourself.
DM’s Background
The background information given here is the background to all parts of this adventure. Much of it will not seem very relevant during Part 1 of the adventure, which follows, and will only be useful in later parts. The section on Skretonas and Home is, however, useful for Part 1.
Althores – King of Fire Giants
In ancient times
the very name would chill the hearts of anyone, whether they be a
follower of law or chaos.
Althores, the immortal giant, and his
legendary steed, Flamis the Fire Worm, were enough to strike terror
into the heart of even the most reckless adventurer. The giant,
Althores, would gather enormous armies of giants, trolls, orcs, and
goblins, and lead them into battle – forcing them to obey him
through fear and awe. Humans, dwarves, elves and hin would gather to
fight, but the giant would always destroy them – yet nothing,
not even the most powerful magic, could injure him.
The giant
and his armies would conquer every region he came to – for none
could stand up to him. But in times of fear and destruction the
Immortals intervene. One Immortal bequeathed the strongest fighter in
the land a staff made entirely of precious metal; when in its
presence it would make Althores mortal. The fighter presently
gathered an army and, as the last hope of men, elves and dwarves, he
marched on Althores. The two massive armies met with a sound like
thunder and the hero immediately charged Althores, who did not
realise the powers of the staff. But even mortal, he was incredibly
strong and slew the fighter. In that moment all seemed lost, but the
fallen fighter’s brother took up the staff and drove his sword
into Althores’s shin. Althores had never known such agony and
he fell, only to have the same sword stab his neck. Thus the battle
was won.
The brother, though, had not realised that the staff
had to be laid next to Althores in his grave to keep him dead. They
threw him in a forgotten pass, and, as the staff was an item of great
power, he took it home. Many months later, he was killed by a dragon
attack on his castle and the staff was taken.
Many years passed
and Althores became a legend, and eventually was forgotten.
But he should not
have been…
The dragon who had stolen the staff was
Flamis, who had survived the battle in which Althores was killed, and
she was in disguise. Ever loyal to her master she stole the precious
staff as revenge, but on examining it with magic, learnt of its
purpose and that her master was not dead. She found the valley where
Althores lay, held between life and death. She healed him and took
him to a new place perfect for a headquarters – an island
archipelago far to the north (which is the Topaxi Archipelago in this
adventure, containing Home). There they made their base in a volcano
and, over the centuries, Althores regained his former strength and
power. They gathered an army, hid the volcano using magic, and found
suitable guardians for the staff – for he could not let it get
into the hands of humans once more.
Everything was going well, and so he made his move: he began to send out armies to the nearby islands. Topaxi was attacked, and then the pesky merchant castle Home. He was sure he would conquer the world. But attacking the Thyatian trading port so soon, when the Thyatians could send able adventurers to find what had happened, was a mistake that Althores, hailing from another age, did not even begin to understand.
Skretonas was the most powerful Necromancer of his land. He loved his power and magic more than anything else. He loved his magic so much that he went too far. One dark night he was performing a ritual when something went awry, and before he knew it he had been struck down with a curse. He was turned into a lich. Not such a powerful lich as to be able to strike people down with a touch, but one who could now cast his spells without such long rituals or personal sacrifices because he had become a favourite of Hel.
Althores in his
hunt for generals quickly found Skretonas and was immediately
attracted to his cruelty and cunning. Skretonas was put in charge of
the attack of Home, along with Nrachag the nagpa and Roryphor the
dark-hood. When he arrived at Home, he disguised himself and slipped
poison into everything which when drunk or eaten turned everyone into
skeletons. That got rid of most of the occupants of the castle; he
then sent Roryphor and Nrachag in, and they brutally murdered anyone
who had survived, and so the castle was taken. The only minor panic
was when a sailing ship arrived, but in the end that was taken care
of with just a small explosive cloud which led them into confusion
and onto the rocks.
When the party in this adventure arrives on
Home, however, Skretonas decides to take a risk and not eliminate
them immediately, thinking that he will have a bit more fun. That
could prove to be his and Althores’s doom…
Players’ Background
The recommended
way to get your players into this adventure is that they are summoned
by the master of Thyatian trade who asks them to journey to the
Island of Home. If you are wondering what he is thinking, asking
companion-level adventurers to explore the island, it is because his
job hangs on this trading port’s profits. The previous Head of
Thyatian Trade had set up a trading deal with Topaxi and the major
trade item was the mineral topaz. The deal was exceedingly profitable
for the Thyatians as the Topaxi natives were unaware of the value of
the mineral elsewhere. If the trade master fails to keep the deal
going, he will be fired. None of the lower-level adventurers he’s
sent to Home have ever returned.
He will try and pay as little
as possible to the adventurers, trying to play on the characters’
kindness and lawfulness to convince them to go. He starts by offering
1,000 gp, but will go up to 100,000 gp. However, he will only give an
advance fee of 10,000 gp, and will never give the rest, no matter
what the players do and how successful they are. He argues on the
grounds that they failed to save the people of Home.
Alternative
ways to get your players started on this adventure include: they
could be sailing in the area, having heard of a hospitable trading
castle; or to be more adventurous, you could have them ship-wrecked
on the island.
Location
The location of the Topaxi Archipelago is up to you. It is based somewhere to the south of the Isle of Dawn and is in a tropical region. It is also north of Davania. Put it where it best suits your campaign.
Travelling
The party must
have a ship and if none of them can buy or hire one then the
merchants’ guild will supply one, but if it is damaged then the
guild demands they keep it and pay for it in full. The crew will also
not obey the adventurers other than to take them to the islands, and
they will have a low morale.
I would advise the adventurers to
take their own ship, with a crew that trusts them. You can, of
course, have any encounter you want on your journey to Home, but I
have not included any in my writing. In later parts I will show maps
of the full archipelago but for now you must be left in the
dark.
Good luck on your travels. A dangerous foe awaits!!!
Part 1: The Peaceful Island of “Home”
The Goal of Part 1
The goal of Part
1 is to free Home from Skretonas, Nrachag and Roryphor. Information
should not be found on Althores or the staff in this part of the
adventure. Players should get enough clues from this part to make
them inquisitive enough to go to Topaxi.
The clues they can
find are:
Thyatian traders have been trading with Topaxi
natives;
two of the merchants who lived on Home are now on
Topaxi;
and finally in the book, which can be discovered in the
treasury at the end of
the adventure, the location of Topaxi is
given and it also states that Topaxi has been very uncooperative
lately.
Give the players prompts if they do not realise the
significance of the clues, or they could even be hired to investigate
further. Topaxi will be described in part 2.
[Map: Island]
http://pandius.com/HomeIsland.png
Caption: Each square corresponds to 30 feet
1. “SHIPWRECK!!!”
Your ship rounds the cold windy shores of the rocky island. Tendrils of mist swirl just above the water. The faint outline of a gloomy stone castle shows atop the 50-foot-high cliffs. The ship creaks and the waves slap against the prow. The crew strain to see ahead in the mist. Suddenly, one of them says, “There’s an opening up ahead. Possibly a harbour.” Before you can reply, there’s another shout, “Shipwreck!”
At this point on the island’s coast, very near the harbour, lies a shipwreck 15 feet below the water.
The ship is a dismal sight: its deck is scattered with rope, timber, and all manner of flotsam; in amongst the detritus the glint of skeletons can be seen, with their bones gleaming eerily white against the forlorn background.
All areas of the ship are underwater and players must have something to enable them to breathe underwater – or they can only stay under for 1D6 + 3 rounds.
[Map: Ship]
http://pandius.com/Ship.png
Caption: Each square corresponds to 3 feet
A. The deck of the ship is as described – covered in flotsam and all kinds of refuse. The door to B is closed and locked, but the entire thing is so rotten that it could be broken by anyone with 9+ strength. The trapdoor down to the lower deck is swinging open. There are three human skeletons on this level: one lying beneath a fallen mast, one lying tangled amidst rope and one clawing at the wheel. If the PCs wish, they can loot their tattered rags, but each reveals merely 5 cp.
B. This is a dismal room filled with broken furniture. A table and four chairs are attached to the floor. A bed at one side of the room still has some surviving pillows and a drifting sheet. A skeleton claws at the window as if even in death it wishes to escape. This is the body of the captain of the ship and he has 5 gp and a ring of protection+1. Beneath the tattered bed, the captain’s treasure chest has been pulled down through the floor to M where a giant octopus lives.
[Image: Skeletons]
http://pandius.com/sk000.png
Caption:
Skeletons, Daz 3d render by Senarch
C.
This dismal room is a horrible mess of floating bits of
rotting food and other miserable substances. The rocks jut into the
side of this room. And a skeleton lies face first in a pot full of
burnt porridge.
This room is quite obviously the kitchen and
is now horrible. The disgusting foods are so gross that the PCs must
make a saving throw vs. poison or vomit and swallow water and
immediately have to swim to the surface or start choking. Unless they
swim up immediately for every round they stay under they lose 1D4 hps
and must make a saving throw vs. death ray or black out.
D, E, G, H, I,
J. These 6 rooms are all pretty much identical as they are all
cabins of the crew and they all have 3 beds and a chest at the end of
each. Each chest has a pile of clothes and a couple of copper pieces:
6 to 15 or 1D10+5. Each room also has 1–3 skeletons within.
Choose or randomly determine. Each skeleton has a further 5 cp.
Room
E has a chest with a false bottom containing a notebook and 50
gp. The notebook, which has been protected from wet by the false
bottom, reveals a few of the crew were planning mutiny and had been
paid to do it by a mysterious person.
F. The
door opens to a large room with a long table with benches
either-side, and a chair at one end. There is a large chest behind
the chair.
This room was the mess hall for the ordinary
folk, and the captain sat in the chair. The chest has wooden crockery
and at the bottom a golden goblet and plate which are both worth 50
gp.
K. This
room holds a large ornate bed and a chest of drawers. In the corner
of the room an altar stands. Lying sprawled next to the altar,
clutching a mace in its hand, is a body. The body is clad in ragged
garments and has a look of utmost fear upon the female face. You are
startled that this body is not skeletal, but appears as if it died
just yesterday.
This is the room of the ship’s cleric.
The mace it holds is magical +1. The body of the cleric, who served
the Immortal Petra, has 100 gp on it. This cleric resisted the spell
that struck down the rest of the crew and was assaulted personally.
She died defending her room. Her body is preserved by some kind of
spell.
L. A
large bed again stands in this room. A chest of drawers is located
here, as well as a desk and chair. The desk has many maps and papers
that are all ruined.
This used to be the navigator’s
apartment and there is a valuable magical item stored in the drawer
of the desk. It allows the user to always be able to find north even
in the worst fog. In another drawer there is a pouch containing 20
cp. All the papers are ruined and unreadable and there is nothing
else of interest here.
M. The
hold of this ship has become the lair of a giant octopus and her
brood of 5.
Giant octopus: AC 7; HD 8; hp 55; MV 90' (30'); #AT
8 tentacles/ 1 bite; D 1–3(x8)/1–6; Save F4; ML 11 (from
her desire to protect her brood); Int 2; AL N; XP 650
5 young
octopuses: AC 7; HD 4; hp 20 each; MV 90' (30'); #AT 8 tentacles/ 1
bite; D 1(x8)/1–3; Save F2; ML 7; Int 1; AL N; XP 75
In
combat, a giant octopus will squeeze a creature with its tentacles
and stab or bite with its fearsome beak. Once its tentacles hit, they
will constrict and automatically do 1–3 points of damage each
round. Each tentacle that hits also reduces its victim’s chance
to hit by 1. A character severs a tentacle when any single hit with
an edged weapon does 6 or more points of damage. If combat is going
against the giant octopus, it will flee, jetting away at triple speed
and trailing a large, black cloud of ink (40' radius).
The
octopus fights as above and desperately tries to protect her brood.
When the characters enter, the octopus is on the ceiling and
automatically gains surprise due to its camouflage. There are three
more skeletons down here (5 cp each). There is also a sturdy
waterproof chest in the wreckage. The chest is locked but not
trapped. It contains 1,000 pp and a ship’s log.
The book
explains that the ship was sent by the traders’ guild in
Thyatis to find out why the Trading Island of Home was not sending
any messages. They set off 3 months back and were sailing fine and
there were no problems.
The last entry dated 2 months ago
reads: We made good progress through the mist guided by our
excellent navigator and are sure to arrive today. Flurk is whining
about the mist and I gave him 5 lashes – mainly because he’s
always been complaining. The crew has been pestering me non-stop and
I am quite fed up. (Here there is a break in the passage.) Home
has been sighted and I must say I am glad. Oddly there is no smoke
and it is a very chilly day. Unusual to have so much mist in summer.
I hope nothing is amiss. I can’t wait for good food and a nice
…
The passage ends in an untidy scrawl and the book
shows signs of being hastily put in the chest.
2. Harbour
This quiet harbour is sheltered from the waves by the rocks. There are currently two small sailing ships in the harbour. For their layout, treat as the SHIPWRECK but neither have a cleric’s cabin and instead the first mate occupies that section. There is the same furniture in both but no treasure and the upper parts of these ships are damp, and while there is no water pooling below decks from wind or rain there is dust. There is no living thing about and the entire area is even devoid of seabirds.
[Map: Castle]
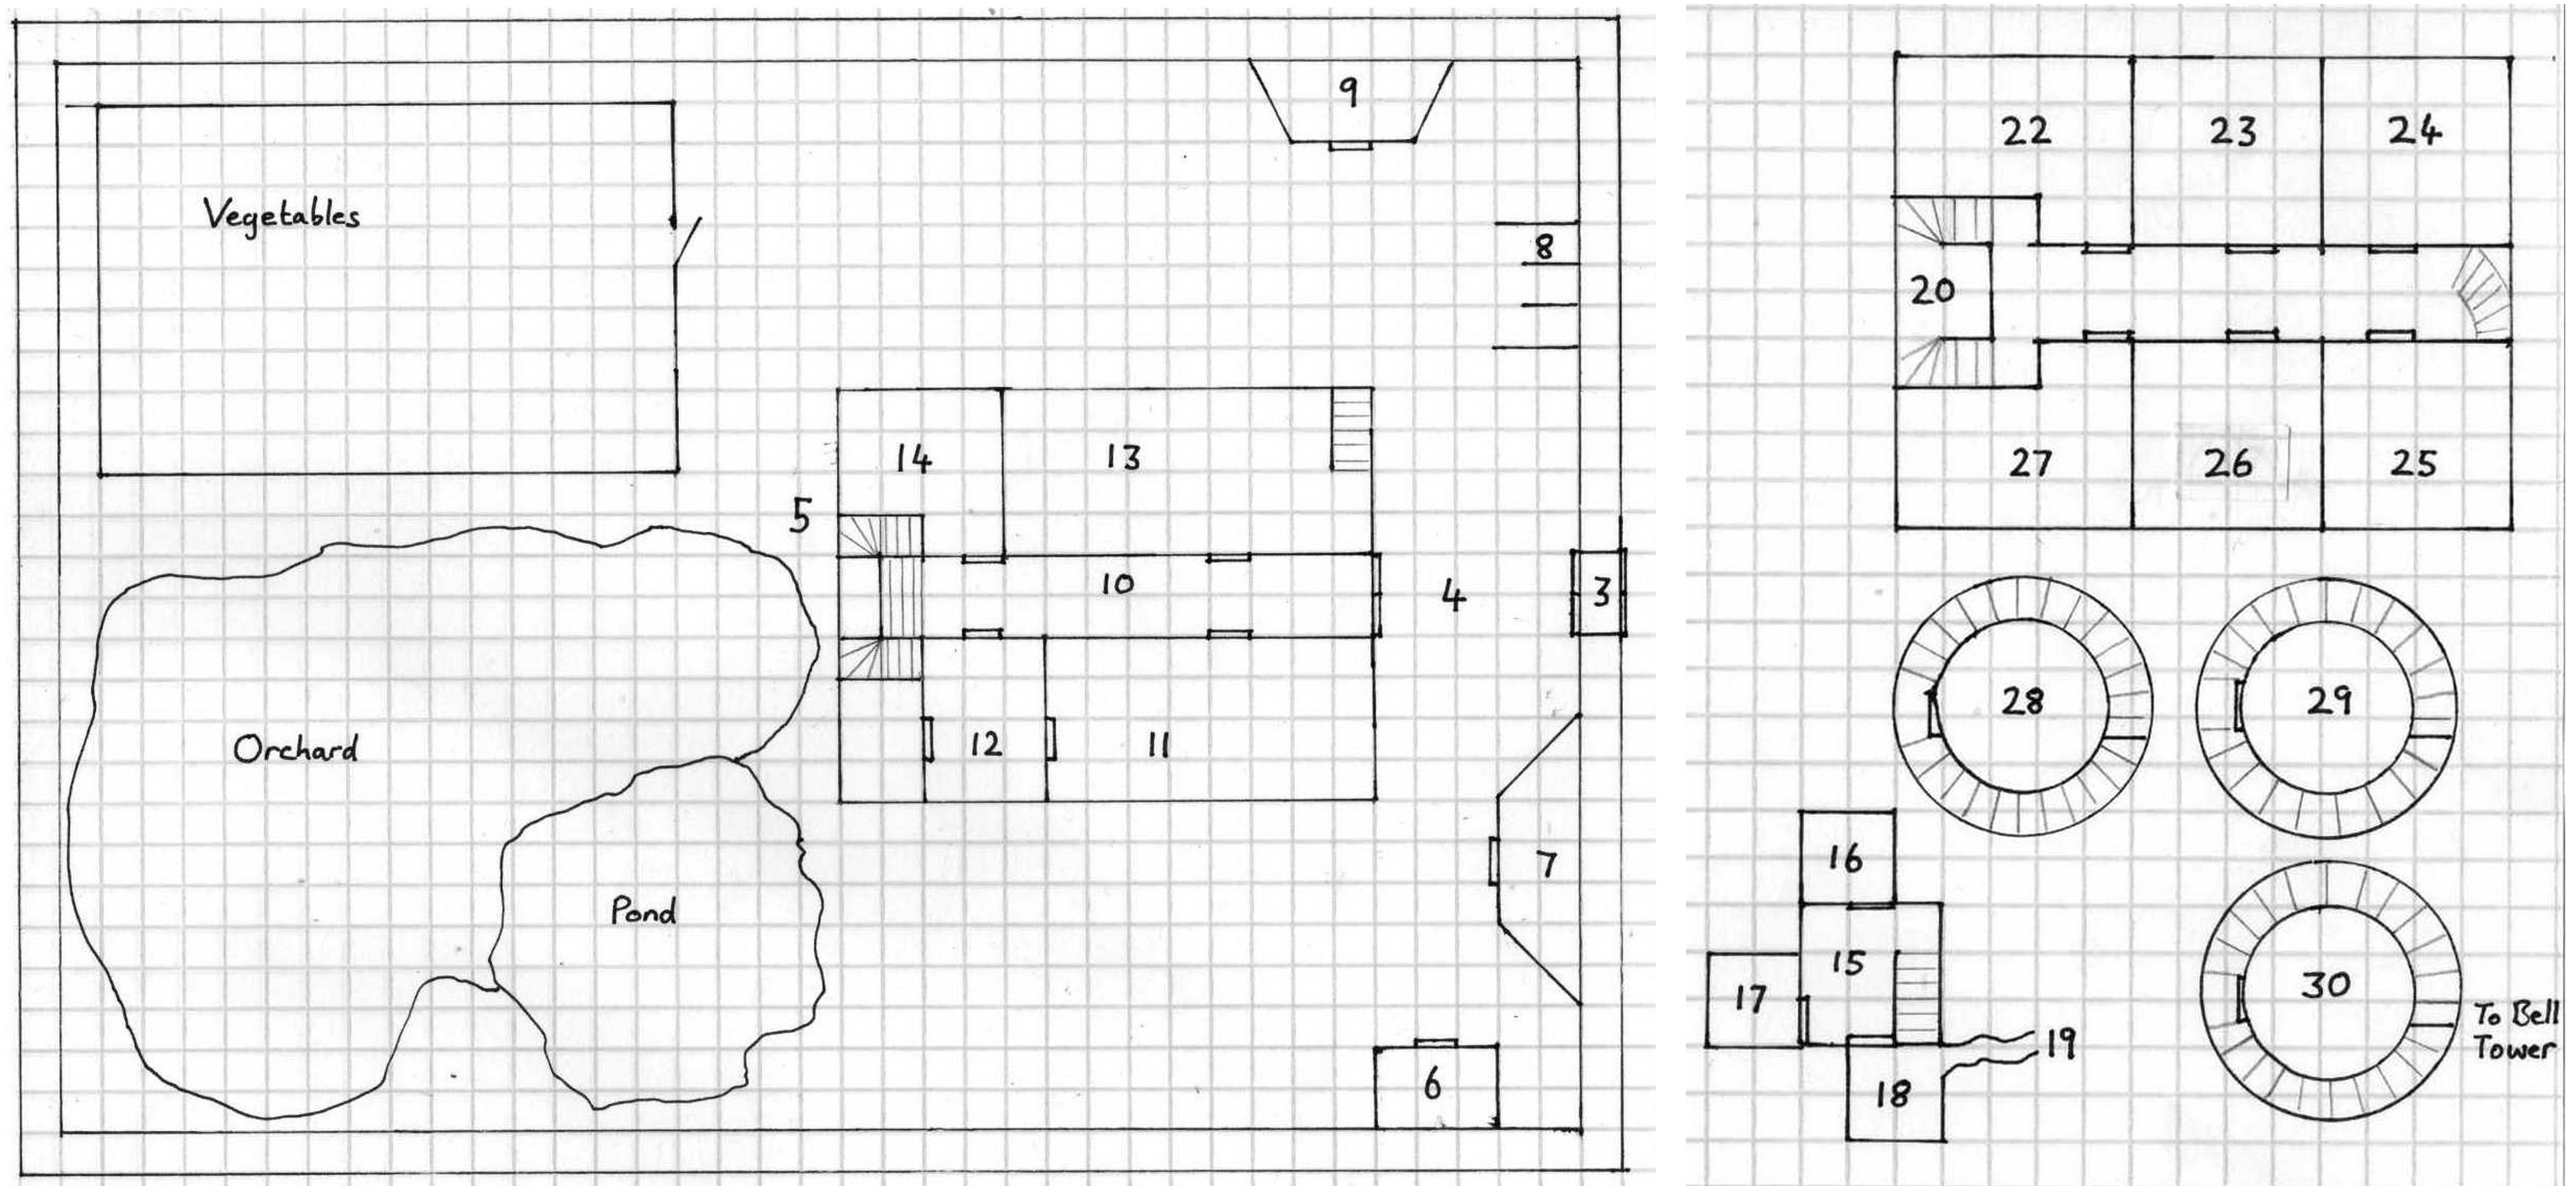
Caption: Each square corresponds to 10 feet
Castle Level 1: Ground Floor & Courtyard 3–14
This entire area is under the effects of Skretonas’s abandon hope all ye who enter here spell.
3. Gates of Death
High walls loom above and the gates are firmly shut. The entire area is in shadow no matter where the sun is. The gates open easily, but the moment the first 2 characters go through, a massive gust of wind blows the gates shut and bowls over the characters. Anyone going through the gate when it shuts takes 10–40 points of damage, but can make a dexterity check for half damage.
4. The Courtyard
The courtyard
of the castle is meant to be a cheery place, but now it is entirely
in shadow. Storm clouds hang in the sky menacingly. It is dark and
gloomy. There are two small buildings to your left and a small
stables and a blacksmith to your right. Around the side of the castle
you see a small pool. And directly in front of you there is the
central keep, which is two storeys high with a bell tower at the
front. It should look cheerful, but its stones have been blackened
and scorched by an incredible power, and are now withering away.
Shivers run down your spines, and the worst part of the entire
horrible scene is that there is not a single sound: no bird cries; no
wind in the bushes – as the bushes are all dead anyway; no
rustling of trees – every one of the trees is twisted and
black; no murmur of human voices; worst of all not even the stormy
sea and the slap of the waves on the rocks is heard –
nothing.
There is nothing special here.
5. The Gardens
The gardens are as described in area 4: twisted, blackened and dead. Underneath all the fruit trees, decayed rotten fruit lie on the ground, but without even a fly or a maggot infesting them. The pool is horribly clear and you can see right to the muddy bottom. Dead fish lie within, but they are nothing but skeletons. The water is exceptionally poisonous. Anyone drinking from it – even just tasting it – must make a saving throw versus poison or die within 6 rounds, unable to do anything because of the agonising pains. The moment they die they will turn into a skeleton. 15 dead seagulls – nothing but skeletons – lie dotted around the yard.
6. The Bakery
The door opens
into a dim room with wooden panelling and a large stone fireplace.
The room is filled with loaves and baking utensils. A skeleton lies
on the floor near the loaves of bread; a rolling pin is still in its
hand.
This room is as it seems except that although the
bread looks good to eat, it contains the same deadly poison as the
pool.
7. The Storeroom
Many sacks of
flour lie in this dimly lit room. They are piled up high –
right to the ceiling. The room was obviously once crawling with rats,
but now there is nothing left but tiny skeletons.
This is
again quite clear: the room is as described and nothing is hidden.
The flour contains the same poison as above.
8. The Stable
This open room
obviously used to be a stable, but now there are just the remains of
three horses amongst the straw – they are all just bones.
This
room is for the three main merchants’ horses that they wished
to bring to the island – a silly mistake. There is a cupboard
in each stall for the saddle and bridle.
9. The Armoury
This dark room is filled with beautiful armour and weapons. There is a large forge and an anvil. The sight of a skeleton lying face first in the forge shows you what happened to the armourer. There are various ordinary weapons and armour from the Expert rulebook lying about, as this counts as a weapon storage, as well as one for making weapons. There is also a secret compartment in the anvil, and the anvil sounds hollow to the touch – it is found by any thief examining the anvil. Inside is a dagger +2, 100 gp and 10 pp, all in a small leather bag.
10. The Hallway
The hallway of this castle is just like an entrance chamber: it is wide, long and tall. The roof is some 10 to 15 feet high, unlit torches are in brackets on the walls, which are decorated. There are 5 ways leading off: two doors on each side and a staircase at the far end of the hall. The first door to the left is a great double door, leading to the eating chamber. The second door to the left is a plain door leading to the kitchens. The first door to the right leads to the barracks and the second to a guest chamber. The hall is very dark if the doors are shut.
11. The Great Hall
The door opens
into a large banquet hall with a majestic candle chandelier lighting
up the place. The table is laden and has food of every type. It is
exotic and the smell of it wafts into the air – it must have
been made just a few minutes ago. Suddenly you realise that all the
robed figures sitting at the table are not eating and drinking, but
they are all skeletons.
This is the banquet room in the
castle. There are 11 skeletons here, all seated in their finest
robes, and one of them, at the end of the table, is actually living –
it is the skeleton of a magic-user, responsible for all the other
skeletons. If the party ever comes back into this room once they have
left, the magic-user will not be there for he is stalking the party
and has cast invisibility and silence on himself, so
unless someone has cast detect invisibility then he cannot be
seen or heard. If he is seen by detect invisibility then he
will cast a spell of destruction instantly on the person, but if he
still lives he will quickly cast fireball and teleport
away to the top of the tower. The PCs should only be allowed to
attack him properly later. This room has a door that leads to the
kitchens. The food all looks very wholesome: there is a large soup
tureen, potatoes, some lovely bread rolls and lots of fruit. There is
a magnificent-looking finely-spiced fish in the centre. The food is
as poisonous as everything else here, see area 5 The Gardens
for details.
12. The Kitchen
This dark room is the kitchen of the castle and three skeletons are all standing exactly where they died: one is stirring a pot of stew; one is reaching for a potato in a sack; and the last is bending into the still hot oven, reaching for a charred haunch of meat. All of the food in this room is incredibly poisonous, see area 5 The Gardens for details.
13. The Barracks
This is a dark room with a large number of beds on the ground – totalling 20 – each with a wooden box at its foot. There is a long, large table in the centre with most of the twenty skeletons in light leather armour, and some in chainmail. Each has a bowl of meaty soup and there are also some rolls and other food. The food is as poisonous, as everything else here, see area 5 The Gardens for details. There is a small trapdoor in one corner that leads down to the prisons.
14. Guest Chambers
This fancy
room is incredibly gloomy for such a fancy area. The bed is a
four-poster and there are some carved wooden tables. A massive chest
of drawers stands in one corner, and there are many candles. But the
gloominess comes from the three bodies lying sprawled around the
room, brutally murdered.
This is the visitor’s
chambers and the bodies are the previous adventurers who came to
investigate the area. The skeleton mage decided to have a bit of fun
with them first, and cast an illusion making it seem everything was
normal, but the moment they relaxed and began to send a message to
the trading hall, the skeleton mage destroyed them.
Level -1: The Crypts 15–19
15. Guard Room
This is the guard room for the prisons and there are three skeletons, all in full plate-mail armour, with large swords. They have the same soup and bread as in the barracks. You can see into all the prison cells 16–18.
16–18: Prison Cells
These are
dusty derelict chambers, each with a straw mat and a pail. The bars
are burst open as if by an explosion.
There is nothing
unusual in two of the chambers. Only number eighteen contains
anything of interest – out of sight, beneath the mat, there is
a small tunnel leading down into the rock for a meter and then
across.
19. Tunnel
This is a narrow tunnel snaking away to the south, just over a meter tall and a meter wide. It leads all the way to a narrow crag right next to the sea, and the entrance is damp.
Level 2: The Living Quarters 20–27
20. The Stairs
The stairs are
plush and ornate, but covered in dust. The floorboards creak as the
players climb, and when they reach the first landing the floor
suddenly opens up to reveal a pit beneath the stairs.
The
players at the front must make a dexterity check at -2 or fall down.
There are iron spikes at the bottom and they do 3–18 points of
damage to anyone landing on them. Whatever happens, the floor which
swings downwards makes an eerie echoing crash. The trap was added
after the castle fell and is used to warn the upper-level creatures
of intruders, and be a nasty surprise.
21. The Upper Hallway
This hallway is dusty and has six doorways leading off. At the end of the hallway are some narrow winding stairs that lead up to the tower. The hallway has torches in the brackets along the wall, but none of them are lit.
22–27: The Bedrooms and Offices
All these rooms
are very similar and each is the abode of one of the merchants. There
is an ornate four-poster bed in each room with a bedside table. Each
room has a massive wardrobe full of garments and a desk with locked
drawers. The keys are in the bedside table’s drawers.
Individual room descriptions show any differences to the above.
22. Bedroom A
A picture of a
beautiful woman with the name Melissa is on the bedside table. It has
an ornate silver frame and is worth 50 gp. There is a letter on the
desk with writing utensils all set out. The ink pot has been spilt
all over the letter, but you can make out:
My dear beloved
Melissa
All goes well here and the trading is good. I really
think my fortune has changed for the better. I will make a bit more
money and then…
It is then blurred and you can make no
more out until the end.
I will come home soon.
Yours
truly
Astenon.
The drawers contain many accounts and
trading papers.
23. Bedroom B
The door to this bedroom has a closed sign hanging from it. The person who occupied it has left for Topaxi. All personal belongings have been taken with them and there is nothing unusual about this room.
24. Bedroom C
The owner of this bedroom liked pets, but as with everything else the pets are skeletal: there are big cages with 2 parrots and 1 snake, and then three cats and a dog on the floor. The cupboard has a lot of pet food inside, now spoiled (see area 5 for details). The drawers contain many accounts.
25. Bedroom D
The cleric of the castle lived here. He was a follower of Asterius, patron of merchants. The room contains an altar to Asterius, and the drawers contain plans about how to win over the natives. There are also many books about Asterius and history on a bookshelf. All of the books on the bookshelf are cursed. If any cleric who follows an Immortal other than Asterius opens or looks at a book they must make a saving throw vs. spell with a plus or minus the difference in Immortal rank. For instance, if the cleric follows a Celestial, then the difference is 2 because Asterius is an Eternal, and so there is a minus 2 to the saving throw. Otherwise they immediately become a follower of Asterius and the Immortal they left will dislike them.
26. Bedroom E
The door to this bedroom has a closed sign hanging from it. The person who occupied it has left for Topaxi. All personal belongings have been taken with them and there is nothing unusual about this room.
27. Bedroom F
The magic-user lived in this room. The bed is particularly comfy and there are many history books on a bookshelf on the wall. There are red robes in the cupboard. The drawers of the desk have been broken open and there is nothing in them.
Levels 3–5: The Tower 28–30
28. Study
This is a lavishly decorated room with an ornately carved wooden desk and large comfy chair. There are also two sofas, a table and a cabinet containing wine (very poisonous: see area 5 for details) and some dainty snack containers – all are now empty. The drawers of the desk contain nothing.
[Image: Nagpa1]
http://pandius.com/kk1a.png
Caption:
Nagpa, Daz 3d render by Senarch
29. Chaos
Unleashed!
Right, DM! Let’s
hope you are reading this before your PCs enter this room. If you
were thinking, “It isn’t necessary to have Companion
players – it’s dead easy!!!”, then I am going to
prove you wrong. You have been warned!!!
If the party choose to
enter this room, read the following DM description:
"This room is a very fancy bedroom with smooth silks and a massive four-poster bed. Ornate candlesticks line the walls and a towering wooden wardrobe stands in the corner."
The moment the last of the party enters the room OR if they move straight on to the next floor, continue the DM description with:
"You suddenly hear a noise from the staircase above: a soft tapping and rustling of a cloak. A frail old man with a walking stick is making his way down the stairs. But when his head comes into view you see it is a crow’s head. The horrific crow-headed Nagpa raises his staff, and with a loud raucous croak slams on the stone staircase. Everything goes black…"
What has just happened is incredibly complicated. The nagpa is a special general in Althores’s armies. Althores has granted him the ability to cast a number of very powerful spells, once per day. He casts the ninth-level magic-user spell timestop. Following that he casts the seventh-level cleric spell, swallow the sun (described below), while in timestop. When the PCs wake they will hear a bell bonging. The moment the PCs wake, the dark-hood swoops up to scare them downstairs. There the skeleton necromancer has performed the ritual for army of dead and raised every single skeleton in the grounds. They all pour forward and attack the PCs. All the monsters are briefly described below, but the nagpa, dark-hood and the necromancer are described fully at the end.
Nagpa (Nrachag): AC 3; HD 9****; hp 70; MV 120' (40'); #AT 1 bite or spells; D 1–8 or special; Save MU9; ML 9; Int 17; AL C; XP 3,700
Dark-Hood (Rorphyr): AC -2; HD 13*; hp 80; MV 240' (80'); #AT 1 touch + special; D 1–4 + fear; Save MU13; ML 11; Int 14; AL C; XP2,300
21st level Necromancer (Skretonas): AC 0; HD 9+12; hp 45; MV 120' (40'); #AT 1 spell; D special; Save MU21; ML 12 (he will only flee if his life is in actual danger); Int 18; AL C; XP 10,500
I will list the skeletons in order of which ones will arrive first. Each skeleton has varying abilities due to who he was in life.
3 Adventurers (Room 14): AC 4; HD 3; hp 15; MV 90' (30'); #AT 1; D 1–8; Save F3; ML 12; Int 1; AL C; XP 35
3 Cooks (Room 12): AC 6; HD 1; hp 3; MV 90' (30'); #AT 1; D 1–4; Save NM; ML 12; Int 1; AL C; XP 10
10 Merchants (Room 11): AC 7; HD1 ; hp 6; MV 120' (90'); #AT 1; D 1–8; Save F1; ML 12; Int 1; AL C; XP 10
20 Soldiers (Room 13): AC 4; HD 3; hp 15; MV 90' (30'); #AT 1; D 1–8; Save F3; ML 12; Int 1; AL C; XP 35
3 Guards (Room 15): AC 2; HD 4; hp 20; MV 60' (20'); #AT 1; D 1–8+2; Save F4; ML 12; Int 1; AL C; XP 75
Armourer and Baker (Rooms 9, 7): AC 7; HD 1; hp 5; MV 120' (90'); #AT 1; D 1–6; Save F1; ML 12; Int 1; AL C; XP 10
Captain (Room 1): AC 2; HD 3; hp 21; MV 90' (30'); #AT 1; D 1–8; Save F3; ML 12; Int 1; AL C; XP 35
20 Sailors (Room 1): AC 7; HD 1; hp 6; MV 90' (30'); #AT 1; D 1–8; Save F1; ML 12; Int 1; AL C; XP 10
3 Horses, 15 Seagulls, 2 Parrots, Snake, 3 Cats, Dog: AC 7; HD 3 (horse) 2 (dog) 1 (cats, snake) ½ (parrots, seagulls); hp 15, 10, 5, 3; MV 120' (40'); #AT 3, 1, 1, 1; D 1–6, 1–8, 1–6, 1–2; Save NM; ML 12; Int 1; AL C; XP 35, 20, 10, 5
This is meant to
be a tough battle, so make it tough. Do whatever you can to make
these creatures destroy the party (without using your DM powers of
“You are the god.”)
The necromancer will flee, so do
what you can to make him live, but if it is impossible you will
have
to change future adventures with him, or substitute him, or make him
come back to life.
30. Treasure!!!
This final room
in the tower is the treasury. The door is locked but Nrachag holds
the key. A lamp hangs from the ceiling, illuminating the contents of
the room: a bookshelf, 5 chests, and a stool topped with a red
cushion, on top of which there is a ring of x-ray vision.
The
chests are all locked, and none are trapped.
Chest 1 has 5,000
pp
Chest 2 has 5,000 gp
Chest 3 is small and contains a box
with a large diamond in it worth 10,000 gp
Chest 4 has a flowing
green cloak neatly folded inside. It is a cloak of protection
+1
Chest 5 has a circlet of gold with a starstone emerald worth
20,000 gp
The bookshelf is filled with fake books. Only two are
real. One is a scroll with polymorph others and charm
monster spells on; the other is a log book containing the records
of the castle. This book gives the location of Topaxi, as well as
many other random thoughts and musings of the recorder. Right near
the end, though, the book says that Topaxi has been strangely
uncooperative lately – and that a couple of merchants are being
sent to investigate...
Ending the Adventure
The adventurers should hopefully be curious and worried enough to pursue this further. If all goes well, they will want to go to Topaxi; if not, you will have to do more prompting. Topaxi will be described in Part 2 (due to come out when I finish it, either on the Vaults of Pandius, the Piazza or in issue #31). I hope you enjoyed it.
Appendix: The Denizens of Home
Dark-Hood (Rorphyr)
The hideous
undead creature known as a dark-hood (or rorphyr) thrives on the
emanations of fear which it creates in its fleeing victims. Although
the creature seldom does much physical harm to its victims, it will
often leave a party scattered, weakened and vulnerable to attacks by
other creatures. The dark-hood appears as a grey, translucent, robed
figure whose cowled face is completely hidden in shadow. Each
dark-hood has a particular territory – typically a few hundreds
of feet across in a crypt, old dungeon, or abandoned village or town.
The dark-hood is unable to leave its territory. Within it, however,
it has complete freedom of movement, being unimpaired even by solid
objects, and it will often appear unexpectedly by emerging from a
wall, floor, or ceiling for example.
A dark-hood can only be hit
by magical weapons of +2 or better, and is immune to spells such as
sleep, charm, hold and so on. The creatures can
be turned as haunts and, like them, are only destroyed on a “D”
result if they fail a saving throw vs. death ray. The dark-hood can
draw visions from the dark depths of its victims’ imaginations.
Those who are the most intelligent have the most fertile minds and
are the most susceptible – thus anyone seeing the dark-hood
must make a reversed ability check by rolling higher than his or her
intelligence on 1d20. For characters who have recently undergone
particularly harrowing experiences, the DM may choose to make them
more susceptible to the dark-hood’s visions by subtracting
between 1 and 3 from the die roll. To those who roll greater than
their intelligence on 1d20, the shadowy void beneath the creature’s
cowl remains empty. To those who roll less than or the same as their
intelligence, the cowl becomes filled by hideous visions from the
depths of their imaginations. Those who experience such a vision flee
in terror from the dark-hood, running maniacally at 30 more than
their usual movement rate for 1d4+2 rounds, changing route at random.
Running from a dark-hood is very exhausting, and fleeing characters
must make a saving throw vs. spell each round or temporarily lose 1d3
points of constitution, plus any hit points that may result from a
constitution bonus being lowered. Any character whose constitution
drops below 3 will fall unconscious until it rises to 3 or more. Lost
constitution is regained at a rate of 1 point per turn. Once a victim
has experienced the fear of a particular dark-hood and has recovered
from it, he or she is immune to further fear attacks from that
creature for the next 24 hours.
In melee, the dark-hood attacks
with a chilling touch which causes 1–4 points of damage and
instills the victim with an overwhelming terror which has the same
effect as an imaginary vision. It is from terrified and fleeing
characters (affected by touch or vision) that the dark-hood draws its
sustenance, and it will pursue them until they drop, often overtaking
them by moving unseen through the walls so as to suddenly appear in
front of them. In this way. the dark-hood will keep fleeing victims
herded within its territory. The dark-hood ignores unconscious
victims, and gives up its "attacks" once all of its victims
have collapsed, recovered from the fear, or have left its area. The
creature, sated from the hunt, will then return to its lair.
[Image: Nagpa2]
http://pandius.com/NagpaJK.png
Caption:
Nagpa, Original drawing by Jeffrey Kosh
(https://jeffreykosh.wixsite.com/jeffreykoshgraphics/home).
Nagpa
Nagpa look like
dried, withered humans with the heads of vultures. They are
intelligent and are highly magical in nature. They may use the
following powers up to three times each day: create flames (causes an
inflammable object within 60' to burst into flames for 1–3
rounds, inflicting 2–12 points of damage per round, halved by a
successful saving throw vs. spell); paralysis (all lawful characters
within 10' must make a saving throw vs. spell or he paralysed for 1–4
rounds); corruption (causes a non-living object within 60' to decay
or rot into an unusable condition – magic items are allowed a
saving throw vs. spell at the level of the character using the item);
darkness; and phantasmal force. In combat, a nagpa will try to avoid
melee if possible, and use its spells.
Nagpa are rarely met,
preferring to stay in deserted ruins or wastes. They speak their own
tongue, their alignment language and the common language.
This
nagpa can also cast timestop and swallow the sun once
per day.
Swallow the
Sun
Range: Special
Duration: Special
This turns
day into night. The sun disappears below the horizon in less than a
minute. All lawful and good creatures must pass a morale check at -2
or flee into the night. Those that don’t flee will fight at -2
till they recover from the shock. Evil creatures will rally to the
spellcaster.
Skretonas, 21st Level Necromancer
Spells 6 –
1st, 5 – 2nd, 5 – 3rd, 5 – 4th, 4 – 5th, 4 –
6th, 3 – 7th, 2 – 8th, 1 – 9th
Memorized
1st:
animate pet, darkness, dead man walking, magic
missile, read magic, skull soliloquy
2nd: dead
bolt, dead ringers, ghoulish touch, lifeglass,
zombie valet
3rd: animate dead mounts, cardiac
arrest, dominate lesser undead, fireball,
skeletonise
4th: abandon hope all ye who enter here,
confusion, dead arm, feign death, mist of the
leech
5th: animate dead, black inferno, black
strike, teleport
6th: death spell,
disintegrate, mort rouge, weather control
7th:
dead spell, reverse gravity, summon object
8th:
death sentence, explosive cloud
9th: army of
the dead