
The Dwarven Mine of Kurest Hurgon
by Giampaolo Agosta from Threshold Magazine issue 16A “Lords of Cruth Lowlands” Dungeon Crawl
This adventure is designed for use with the BECMI rules set. It is appropriate for a group of adventurers with a Total Party Level ranging between 38 and 44, or 5-7 characters of levels 6-9. It is set in north-western Karameikos, in the Cruth Mountains at the crossing of the Achelos River. The main enemies are Ruvaak, a black dragon, and orcs of the Rotting Snakes tribe led by Malgur, a high level orc chieftain.
Background
More than two centuries ago, the hill giants created a permanent settlement in the Cruth region, cutting the communications between Kurest Hurgon, a dwarven mine in the Black Peaks, and the Kingdom of Achelos, the primary Traladaran dominion in the Cruth Lowlands. Traladaran warriors and adventurers led by the Vampire Wars veteran Moira the Pure, a priestess of Petra, attempted to breach the siege and reach the dwarves. However, they were ambushed by the giants -- who had been warned by the Cruth Ogres of the Traladarans’ arrival -- while crossing the Achelos River at Three Axes Ford. The giants, who had positioned themselves on the mountain spur overlooking the ford, easily crushed the Traladarans by tossing large boulders from their vantage position. However, dealing with the dwarves was not as easy. The miners simply closed the doors of their mine and retreated deep into the mountain, where the larger giants could not follow them. The dwarves have been able to support themselves (and even raise animals) for extended periods on a diet of underground fungi. The dwarves periodically send scouts to the surface, but have never managed to get through the ford and contact other settlements.
Recently, they have been besieged by other enemies able to deal with the tunnels. Thus, they have tried a sortie, where a few dwarves were captured by the giants. If freed, the captured dwarves will ask the PCs to help their clansmen, who are now trapped in the mine. The catch is that the dwarves are now besieged from both the upper and the lower levels of the mine: orcs from the Rotting Snakes tribe are trying to take over the mines for their own use, while a small black dragon (Ruvaak, the eldest of Vulomar’s offspring) has found a submerged entrance from the small lake north of the Three Axes Ford into the lower mines, and set up his lair there.
Inside Kurest Hurgon
Within Kurest Hurgon, random encounters should be rolled sparingly -- there are many enemies, and random monsters will only appear in empty areas, with a 1 on 1d6 frequency. You can use the following table to determine the type of random encounter, based on the level of the dungeon.
[Table 1: Random Encounters]
Level 1: Natural Caves
[Image: Map of Kurest Hurgon: the caves ]

1 Entrance: This cave opens on the Cruth Peaks. It is apparently deserted, though a Tracking roll shows recent traces of passage of many humanoids.
[Image: Cave Entrance]
2 Entrance: This cave opens on the Cruth Peaks. A successful Tracking roll does not detect any recent passage of humanoids.
3 Makeshift trap: The orcs have set up a simple trap here. A hidden trip wire opens a jar of poisonous gas. In two rounds, the gas fills the cave. On the first round, the gas is not very concentrated, and only a ST vs Poison at +2 is needed to avoid its effects. On the second round, a standard ST is needed. In the third round, the poisonous gas starts dissipating, requiring a ST at +2, whereas from the fourth round it is too thin to have any effect. On a failed ST, the poison causes the temporary loss of 2 points of Constitution. A successful Healing or Herbalism roll will restore the lost points in 1d4 days. Otherwise, the recovery time is increased to 1d6 days.
4 Guardpost: Two orcs (Orc 2) hide behind a makeshift barrier of barrels, wooden planks, rocks, and tree branches. They raise the alarm by blowing a horn, then fight defensively until help arrives.
5 Orc camp: 12 orcs (Orc NM) camp in this cavern. Unless warned by combat in other areas, they are surprised and scatter and flee if attacked.
6 Orc chief camp: The chief of this group of Rotten Snakes, Urdan (Orc 9) camps here with his most trusted followers (Orc 3, Orc 4/Shaman 2, and Orc 4). Their weapons are poisoned spears. The weak poison does not kill, but is very virulent (-2 to ST) and causes paralysis (onset in 1d4 rounds, lasts 1d4 turns). The orcs are inured to this type of poison, and save at +4 instead. Urdan also has a heavy shield +1, which can be used as a knife shield, although it deals bludgeoning instead of piercing damage. It requires the knife shield weapon mastery, otherwise it acts as a normal magical shield. The shield was stolen from the dwarves, who called it Ghyrfar, the stout wrecker.
[Image: Rotting Snakes]
7 Fungus forest: This cave is difficult to navigate due to the large fungi that crowd it. However, it is easy to hide here (+30% Hide in Shadows).
8 Fungus forest: This large cave is overgrown with giant fungi. It was once a cultivated area, but the dwarves were chased away and more monstrous fungi took over, displacing the cultivated varieties. A shrieker fungus, in particular, is found here.
9 Fungus forest: This cave is difficult to navigate due to the large fungi that crowd it. However, it is easy to hide here (+30% Hide in Shadows).
10 Fungus forest: A yellow mold hides among the fungi of the area.
11 Passage: The orc chief retreats through this passage to reach area 12 if he feels threatened in area 6. He fights defensively until he can get help from the guards there.
12 Barbican: four orc guards (Orc 2) and one mercenary ogre (Ogre NM). The orcs are armed with poisoned spears (see area 6 for details), while the ogre wields a large club.
[Image: Way to Kurest Hurgon]
Level 2: Dwarven Town
[Image: Map of Kurest Hurgon: the town ]
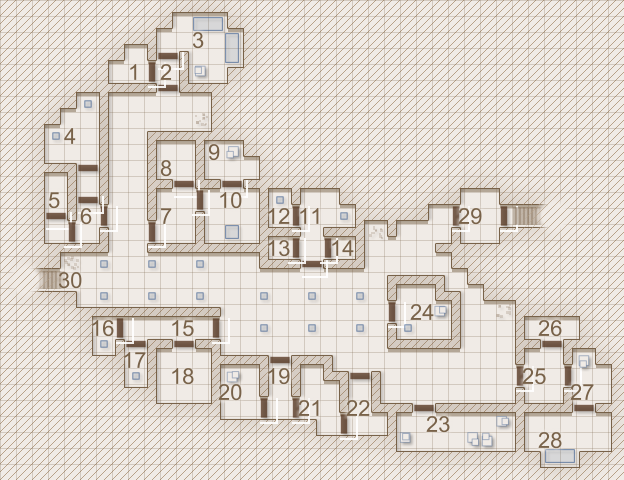
Iron Workshop
1 Storage: This room was used to store iron bars and other supplies employed in the forge. Some iron bars are left, and can be used as improvised weapons (as clubs, also in large size usable by ogres).
2 Hall: The entrance hall was also used to show the products of the iron workshop. It saw a great battle between the dwarven smiths and the orcs, and dried blood is splattered everywhere, together with decayed bodies. The dwarven smiths came back to haunt this area as lesser haunts. They can be laid to rest by restoring Kurest Hurgon to the dwarves and properly interring their corpses.
3 Forge: The forge is cold. While some orcs are able to perform basic smithing tasks, this tribe does not have any smith, and relies on plundered iron and steel tools.
Ghyrats House
4 Living room: The furniture of this once well-appointed living room has decayed to tatters. Orcs (8 Orcs NM) are camping here. They will try to flee and warn the shaman in area 30.
5 Bedroom: This bedroom has been claimed by an Ogre (Ogre 5). He is sleeping, crouching on the dwarf-sized double bed. He is automatically surprised if the orcs in area 4 are unaware of the intruders.
6 Hall: This area is mostly empty, although one of the orcs from area 4 may be actually be found here (1 in 4 chance).
Brewery
7 Saloon: This area is still furnished with stone benches and tables, which have resisted even use by the orcs. There are usually 6 + 2d4 orcs (Orc NM) here, drinking out the last of the dwarves’ beer reserves.
8 Kitchen: The kitchen is abandoned. A few rats (1d4-1) may be found here, but will flee if disturbed.
9 Storage: The beer and grain once stored here have been plundered.
10 Brewery: The tools and tubs used by the dwarven brewers have been taken over by an orc shaman (Orc 5/Shaman 4), who produces a foul fermented beverage used by the orcs. The shaman is usually assisted by 1d4+2 orcs (Orc NM), but is only present occasionally (1-2 on 1d6). The beverage contained in the tubs is mildly toxic for non-orcs: on a failed Constitution roll, it causes nausea (-1 on all activities for 24 hours). However, a ST vs Poison is also needed. Failure means some nasty hallucinogenic bacteria have gotten into the imbibers system, causing confusion as per the spell.
Pottery
11 Storefront: This shop was the main area where customers could inspect and buy pottery items. Dwarves do not like pottery, considering it fragile, but find it expedient for everyday use as it can be produced easily. Thus, dwarven pottery is rarely decorated. Kurest Hurgon was no exception, and little of value is found in this area.
12 Workroom: This area contained tools to shape and bake pottery. The oven is still functional.
13 Storage: This storage room is occupied by a heap of broken pottery shards. Clumsy individuals searching the area may cut themselves on a failed Dexterity roll for 1d4 damage.
14 Storage: This storage area is empty. A single orc (Orc NM) is sleeping here in a drunken stupor.
Korden House
15 Entrance Hall: The entrance to Korden House is decorated with intricate carvings showing the symbols of the family, the clan, and the likenesses of the ancestors, a veritable parade of ancient dwarves.
16 Bedroom: This bedroom used to house the family leaders. It is now occupied by Targul, an orc witch doctor (Orc 8/Shaman 4/Wicca 3) and his pet, a viper. The orc has appropriated the axe of Oric Korden, a finely decorated and well-balanced weapon (battle axe +2, +4 vs spellcasters).
17 Bedroom: This bedroom was shared by the junior members of the family. It is now used by Targul for its ritual practices. It contains a ghoulish collection of bones, dessicated body parts, fetishes, and a large, stinking cauldron.
18 Living room: Targul’s retinue has taken residence here. It is composed of four apprentices, (Orc 2/Shaman 1, Orc 3/Wicca 2, Orc 2, Orc 3/Shaman 2).
Lhyrest House
19 Entrance hall: The Lhyrest family decorated the entrance to its mansion, and most of the other rooms, with fine mosaics.
20 Bedroom: This once-beautiful room is the camping site of a group of 10 orcs (Orc NM).
21 Bedroom: This bedroom once housed several members of the Lhyrest family. It is now used by the strongest orc of the tribe, Malgur (Orc 10). He lives here with his three concubines (Orc NM). Malgur is armed with a mace +1 and a shield +2, both of dwarven making.
[Image: Malgur of the Rotting Snakes]
22 Storage: Malgur keeps here assorted treasure stolen from the dwarves. The treasure, which has a total value of 3,000 royals, is locked into two large chests. Both are trapped (ST vs Poison at -1 to avoid the lethal poison), and Malgur keeps the keys on his person at all times.
Warehouse
23 Warehouse: This building was employed to store food by the dwarves. Three Carrion Crawlers have taken residence here, preying on straying orcs, rats, and other vermin.
City Hall
24 Offices: This hall was used both as the meeting room of the dwarven clan, and as their archive. High shelves hosted books and scrolls, but the room has been thoroughly ransacked by the orc witch doctors. However, on a difficult Loot roll, the PCs may find a scroll of protection from magic overlooked by then.
Guildhouse
25 Guildhall: The true political arena of Kurest Hurgon used to be the Guildhall, where the leaders of the craft guilds met. This hall is designed to hold meetings large and small, and is furnished with heavily decorated stone benches. Bas-reliefs on the upper part of the walls describe the daily work of the guild members.
26 Guild offices: These workrooms were employed by the dwarves to produce the trade records that were then stored in the nearby City Hall. The area is now abandoned.
27 Jewelsmith: The master jewelsmith and his journeymen operated from this workroom. Due to the high value of the materials, they employed two guardian obsidian golems, which are still operating. Raw and partially cut gems worth 500 royals are found in the room.
28 Alchemical Laboratory: This laboratory was used by the dwarven alchemists to support the jewelsmiths. Left unattended, the chemicals stored here have degraded, and many are dangerous. However, several are still useful and valuable. Overall, there are alchemical compounds worth 1,000 royals in the room, but failing a difficult Alchemy roll while searching the area activates an exploding trap, which attacks as a fireball (5d6 damage, roll vs Spells for half damage). The alchemical compounds are destroyed in the explosion.
Guardhouse
29 Guardhouse: This building is still in use by guards, except that the guards are now orcs rather than dwarves. Four guards (Orc 4) and a commander (Orc 7/Shaman 1) stand guard in this building.
Temple road
30 Stairs to the temple level: The stairs to the lower levels are guarded by a troop of orcs (10 Orc 1), supported by two ogres (Ogre NM) and commanded by an orcish shaman (Orc 4/Shaman 3).
Level 3: Temple of Kagyar
[Image: Map of Kurest Hurgon: the temple ]
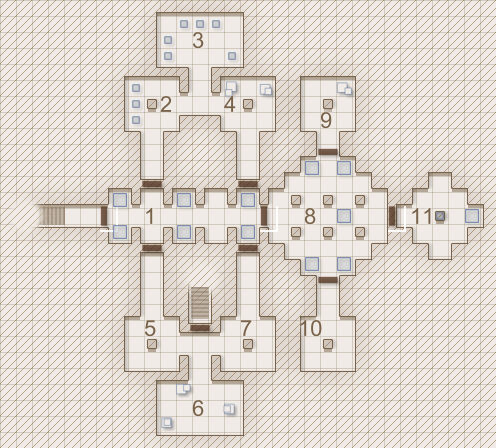
1 Hall of the Dwarven Kings: The likenesses of the past leaders of Kurest Hurgon are preserved by the statues in this corridor. Four niches are still empty. Secret doors lead to areas used by the refugees, and a massive bronze door opens on the main temple area. The door leading to the city is locked and barred from the temple side. Six dwarf warriors (Dwarf 4) stand guard here. Two of them are armed with crossbows and battleaxes, the other two with sword and shield.
2-4 Refugee camp: Ten dwarves (6 Dwarf 1, 2 Dwarf 2, 1 Dwarf 3, 1 Dwarf 4) are camped in these rooms, together with provisions for many months. The food is mostly dried fungi and meat, but it is sufficient for the hardy dwarven physiology.
5-7 Refugee camp: Twelve dwarves (8 Dwarf 1, 3 Dwarf 2, 1 Dwarf 4), as well as four children, are camped in these rooms.
8 Forge of Kagyar: A forge takes the place of the altar in this dwarven temple. Statues representing Garal, Denwarf, Everast I, and Orur Ghyarts, the founder of Kurest Hurgon, are located around the forge. Two dwarf clerics (Dwarf Cleric 2) stand guard here.
9 Sacrist: The leader of the dwarves, Duin Lhyrest (Dwarf 7) and the dwarven priestess, Bala Korden (Dwarf Cleric 5), have settled in this room, which was mostly used to hold ceremonial items used in the worship of Kagyar. The items (worth 300 royals) are still here, in a locked chest. Duin is armed with a battleaxe +1, and has a plate mail, whereas Bala has a chain mail +2, and fights with mace and shield.
[Image: Duin Lhyrest]
10 Storage: A stock of dwarven iron rations is stored here. They will serve to support six people for one month. There is also a sizable stock of potent dwarven mushroom liquor. Drinking this distilled alcohol forces the imbiber to pass a ST vs Poison or become drunk for 2d4 hours.
11 Secret sanctum: The statue of Kagyar dominates this inner room. An anvil-shaped altar is also found here. The room is otherwise bare.
Level 4: The Mines
[Image: Map of Kurest Hurgon: the mines ]
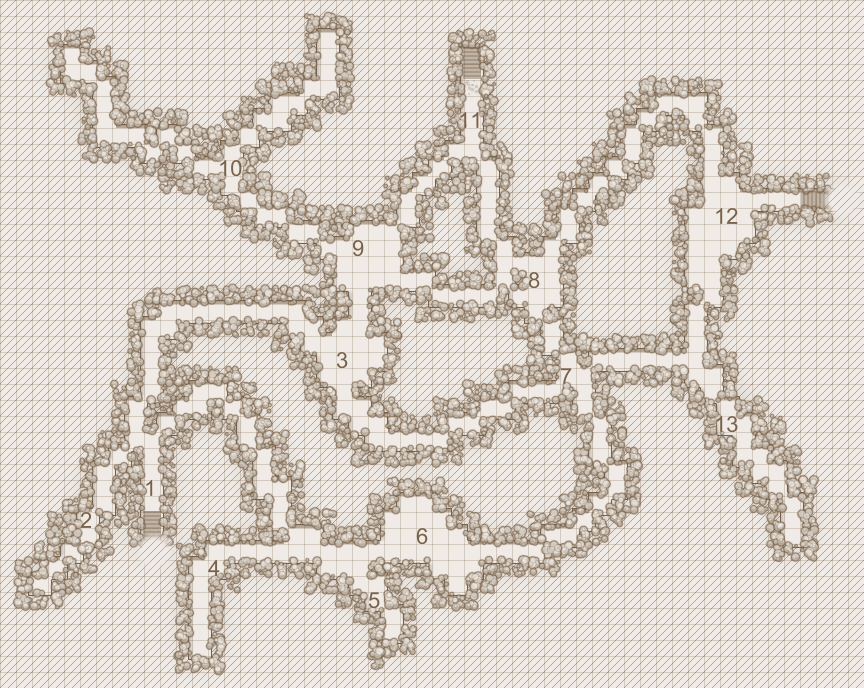
1 To the temple of Kagyar: This path leads to the temple under Kurest Hurgon.
2 Mining tunnels: This tunnel was being dug to open new areas to mining. Some mining instruments and a small cart are found here.
3 Battlefield: This area saw a strong resistance by the dwarves during the orcish invasion. It is littered with broken weapons and rusty armor pieces. A successful Loot skill roll will identify a battle axe +1 +3 vs goblinoids, while a successful Nature Lore roll will identify traces of the passage of the dreaded rust monsters (they were scared away by the haunt in area 9, though).
4 - 5 Mining tunnels: These tunnels were collapsed by the dwarves to trap invading orcs. It is impossible to excavate through them to reach the upper caverns.
6 Iron vein: The area was still in use as a mine before Kurest Hurgon was invaded. Iron ore litters the walls. Traces of the rust monsters can be found with a successful Nature Lore roll.
7 Crossroad: Traces of rust in this area show passage of the rust monsters towards area 13 and 6, but not towards area 8. The information can be obtained with a difficult Tracking roll.
8 The Dusanu: A single orcish body lies in the middle of this cavern, sitting against a rock pillar (it is not in sight for those coming from areas 9 or 11). The body is mouldy, as it is infested by a dusanu colony.
9 Battlefield: this cavern was the site of a large skirmish during the initial orcish invasion. The bones of the dead litter the floor. A lesser banshee haunts the area, mourning the loss of the dwarven chieftain, the former leader of the Lhyrest clan.
10 Mining tunnels: these tunnels were part of the dwarven mine, but were abandoned when the veins here were exhausted. They are less maintained than other areas, and there’s a 10% chance of a collapse, which causes 4d6 damage to all in the area. A ST vs Dragon Breath halves the damage.
11 To the city of Kurest Hurgon: the path is blocked by a collapsed section of the tunnels.
12 To the dragon’s lair: this path leads downwards to an underground lake, which has become the lair of a dragon.
13 Mining tunnels: A pair of rust monsters was chased into this level by the dragon below. They subsist on the iron ore the dwarven used to mine, as well as by eating the residues of the dwarven and orcish weapons and armor.
Level 5: The Dragon Lair
[Image: Map of Kurest Hurgon: the dragon lair ]
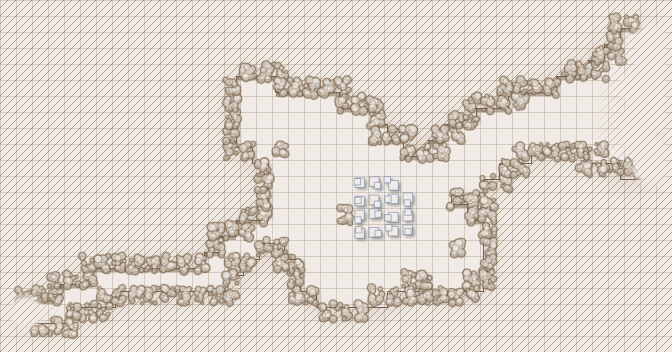
This level is composed of a single large cavern, with two accesses: a tunnel leading to area 12 of the mines, and a large passage leading to an underground lake, which Ruvaak (small black dragon, 8** HD), the black dragon living in this area, uses to enter and exit the lair.
[Image: Ruvaak]
When the PCs arrive, Ruvaak is in consultation with a deep glaurant envoy. While the demonic features of the envoy may lead the PCs to attack, the glaurant has no interest in fighting the PCs, and may depart peacefully if the PCs look able to take over Ruvaak. This lowers significantly the difficulty of this encounter. However, if the PCs defeat the glaurant envoy as well, they may retrieve from his body a treasure map leading to the Shadowdeep, and a medallion of ESP, 30’ range.
Nevertheless, Ruvaak still has collected a large treasure, including 4,500 copper coins, 25,000 silver coins, 15,000 gold coins, 25 assorted gems (ambers, amethysts, garnet, jades, jaspers, and an aquamarine, for a total value of 2,500 royals). Finally, the sceptre of the dwarven lords of Kurest Hurgon (value 1,500 gold pieces) is found among the treasure. A clerical scroll with the spell Dispel Evil and a potion of heroism are also kept in a stout locked coffer.
Conclusion
If they manage to defeat the orcs and Ruvaak, the PCs can finally restore the dwarven rule in Kurest Hurgon. This brings them to the attention of the rulers of Karameikos -- and counts as one of the heroic feats needed to be awarded a knighthood or other nobility title. While the PCs can take Ruvaak’s treasure with them, it really belongs to the dwarves. If the PCs return it, they also come to the attention of King Dorfus of Highforge, who will award the PCs a token of friendship, a ring with a special sigil, which marks the wearer as a friend of Highforge. This allows the wearer to obtain free lodging in Highforge, or, only once, to call the help of the gnomish army (a single 100-strong company of dwarven crossbowmen will assist the PCs in a field battle or siege). Otherwise, the dwarves and gnomes will be wary of them in the future.
Tables
[Table 1: Random Encounters]
|
Roll (1d4+Dungeon level) |
Encounter |
|
1 |
3d4 Giant Rats |
|
2 |
2d4 Orcs, with an Orc 2 leader |
|
3 |
2 Ogres |
|
4 |
Dwarven NPC party (3 Dwarf 3, 1 Dwarf Cleric 4, Dwarf 4) |
|
5 |
1 Rhagodessa |
|
6 |
1 Carrion Crawler |
|
7 |
1 Rust Monster |
|
8 |
1d4 Rock Toads |
Images
|
|
[Image: Cave Entrance] Cave Mouth by William McAusland. Used by permission. |
DP-1-3
|
|
|
[Image: Way to Kurest Hurgon] Warriors reading runes by William McAusland. Used by permission. |
DP-1-10 |
|
|
[Image: Duin Lhyrest] Dwarf close up by William McAusland. Used by permission. |
SA-3-13 |
|
|
[Image: Ruvaak] Dragon on hoard by William McAusland. Used by permission. |
SA-4-25 |
|
|
[Image: Malgur of the Rotting Snakes] Humanoid profile by William McAusland. Used by permission. |
SA-3-20 |
|
|
[Image: Rotting Snakes] Three orc warriors by William McAusland. Used by permission. |
SA-1-4 |
|
|
[Image: Map of Kurest Hurgon: the caves ] Map by G. Agosta, used by permission. Designed with ANAmap by Sébastien Bénard |
https://drive.google.com/open?id=0B63TLs3TewqyZ2lGbGpYRURRaFU |
|
|
[Image: Map of Kurest Hurgon: the town ] Map by G. Agosta, used by permission. Designed with ANAmap by Sébastien Bénard |
https://drive.google.com/open?id=0B63TLs3TewqybVg1cUEyWWxpNkk |
|
|
[Image: Map of Kurest Hurgon: the temple ] Map by G. Agosta, used by permission. Designed with ANAmap by Sébastien Bénard |
https://drive.google.com/open?id=0B63TLs3TewqybmVHT0E1dkI1ZlE |
|
|
[Image: Map of Kurest Hurgon: the mines ] Map by G. Agosta, used by permission. Designed with ANAmap by Sébastien Bénard |
https://drive.google.com/open?id=0B63TLs3TewqyUUs1aWZxNWRXelE |
|
|
[Image: Map of Kurest Hurgon: the dragon lair ] Map by G. Agosta, used by permission. Designed with ANAmap by Sébastien Bénard |
https://drive.google.com/file/d/0B63TLs3TewqyRktTRkp1Q0VNeHM/view?usp=sharing |
Column 1: This column remains blank - it will be used by Layout to populate the page number.
Column 2: This column contains the [Image Label], real life description of the work, licensing information, and resource where the image was found.
Column 3: This column contains the URL of the image source.