
Mystara Weather
by RobinWe use several systems to detail weather and its effects in D&D and Mystara here in Particular.
My expanded table from TM!/2 I will reveall here later,
Yes a handy screen for use during the game, where players get a notion of what conditions they are in (or going into),
I hope you like it
The extensive tables in Trail Map 1-2 for example
or the simple system from B10
On the other hand other Gazeteers, the RC or adventures added more effects and extra rules
I tried to combine these together.
Yet I am ready with the DM/PC screen
Usable by whatever weather system you use.
It is BECMI D&D , so those using later D&D systems might have to readjust some parts
and the DM knows eaily what each condition has for gaming effects
This DM/Player screen requires some crafting together.
The DM Screen is here;
The PC Screen is here;
The sidessupport screen is here;
Please for best results use the DOWLOAD option and not the copy picture by mouse.
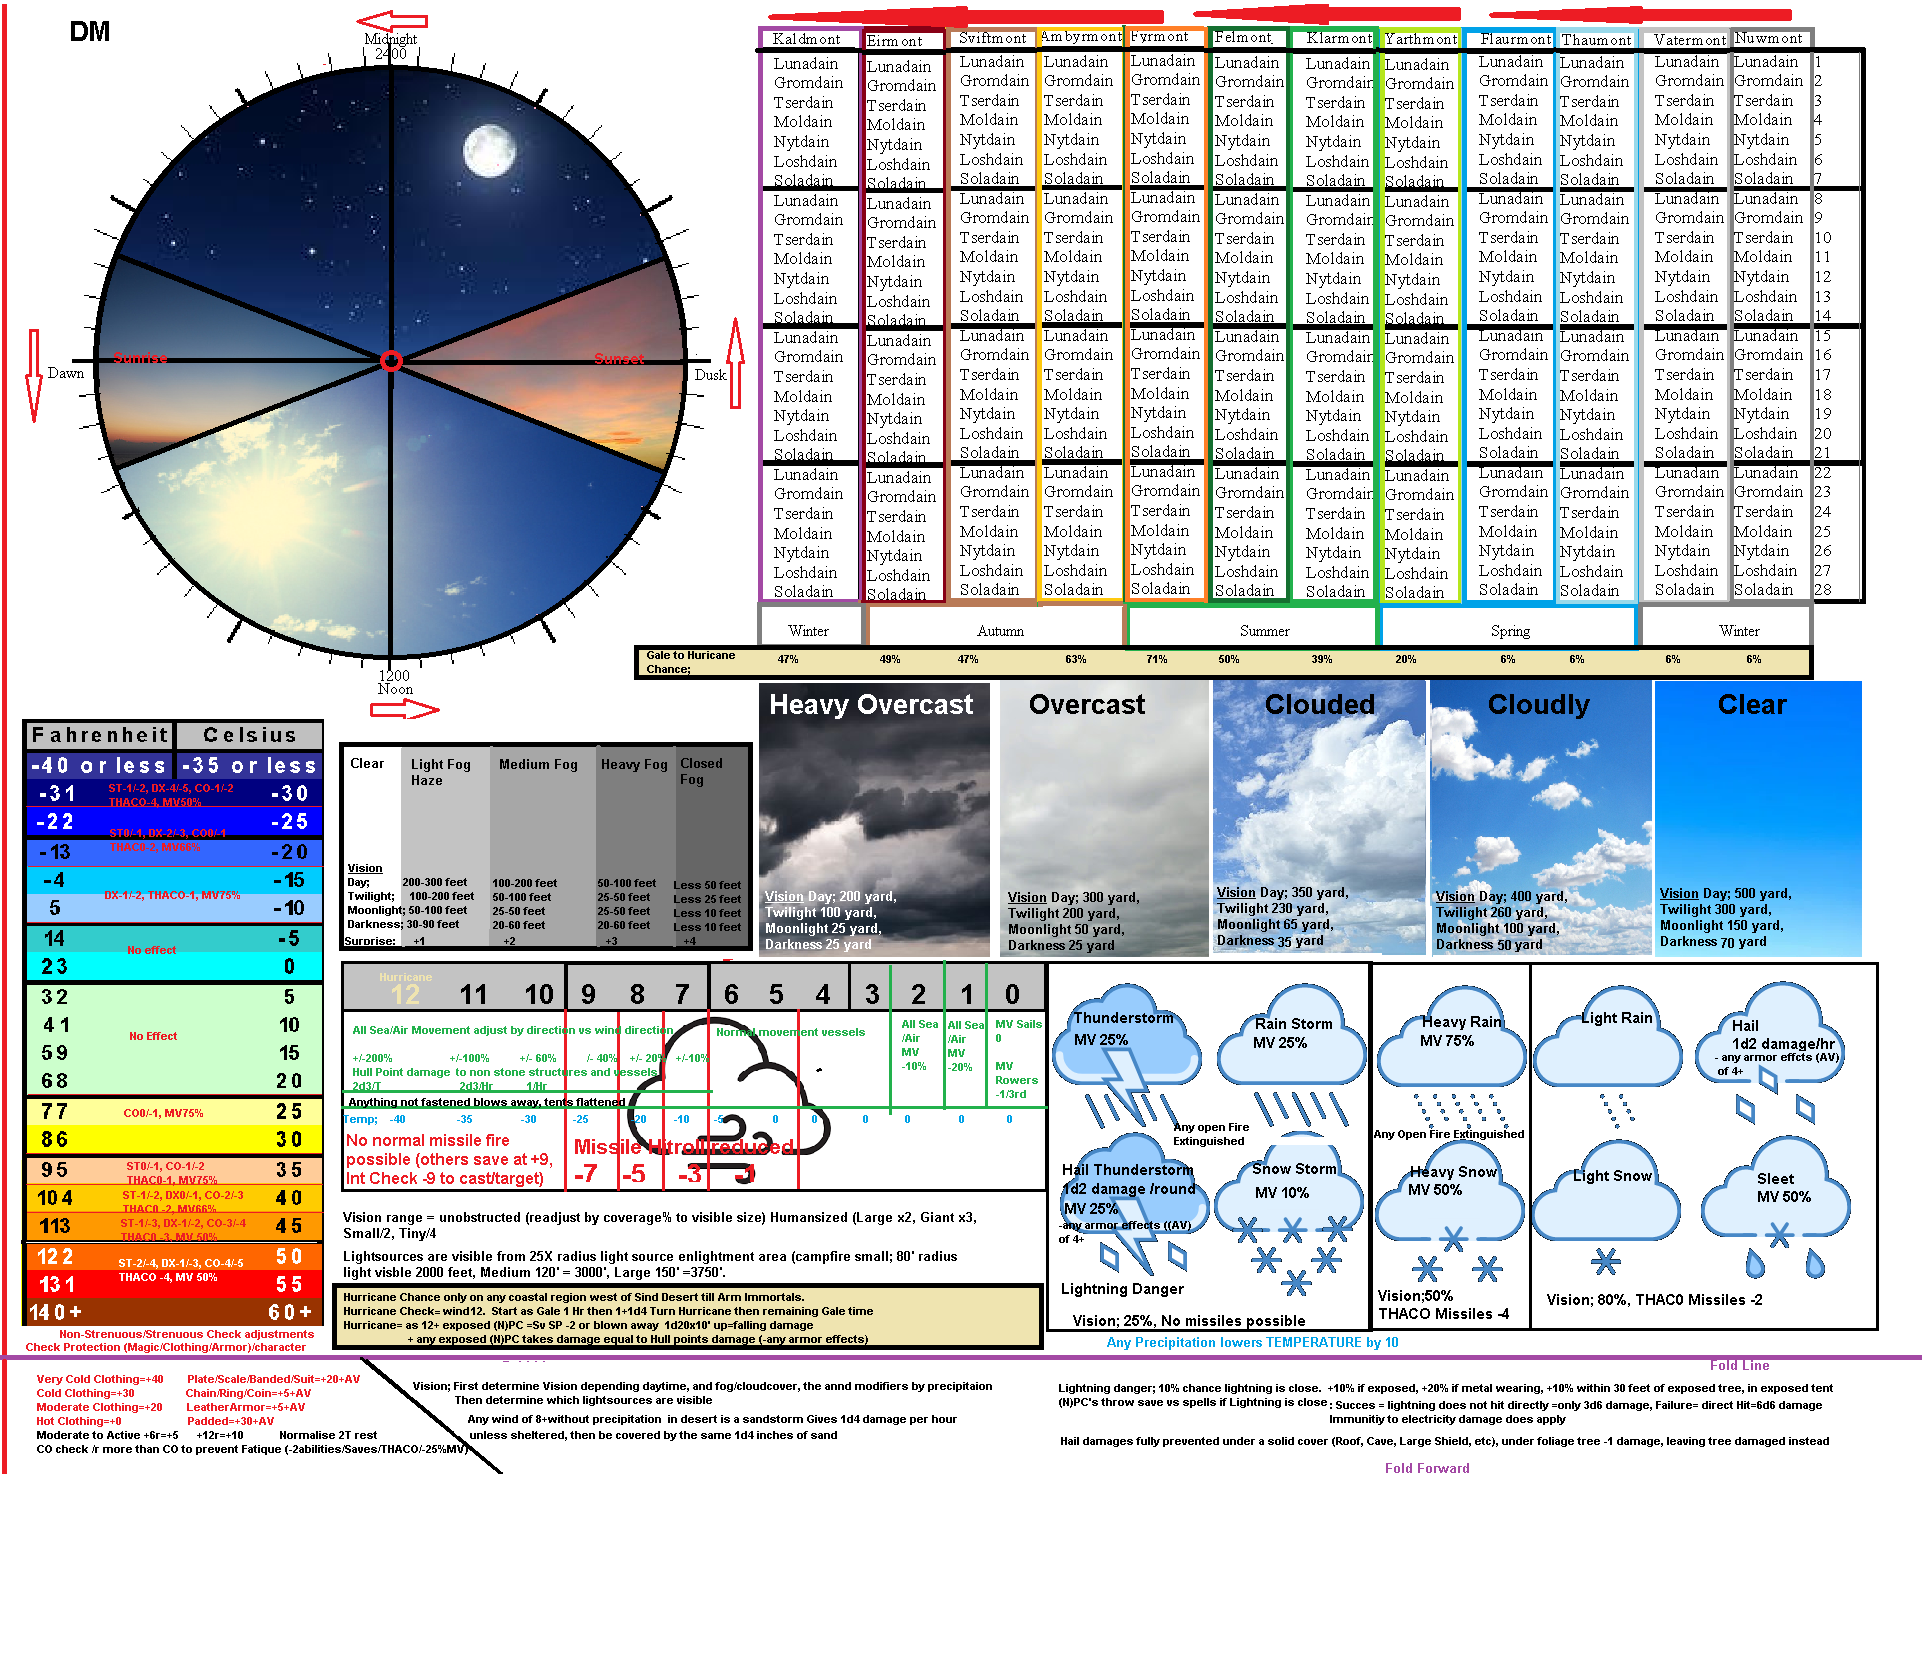
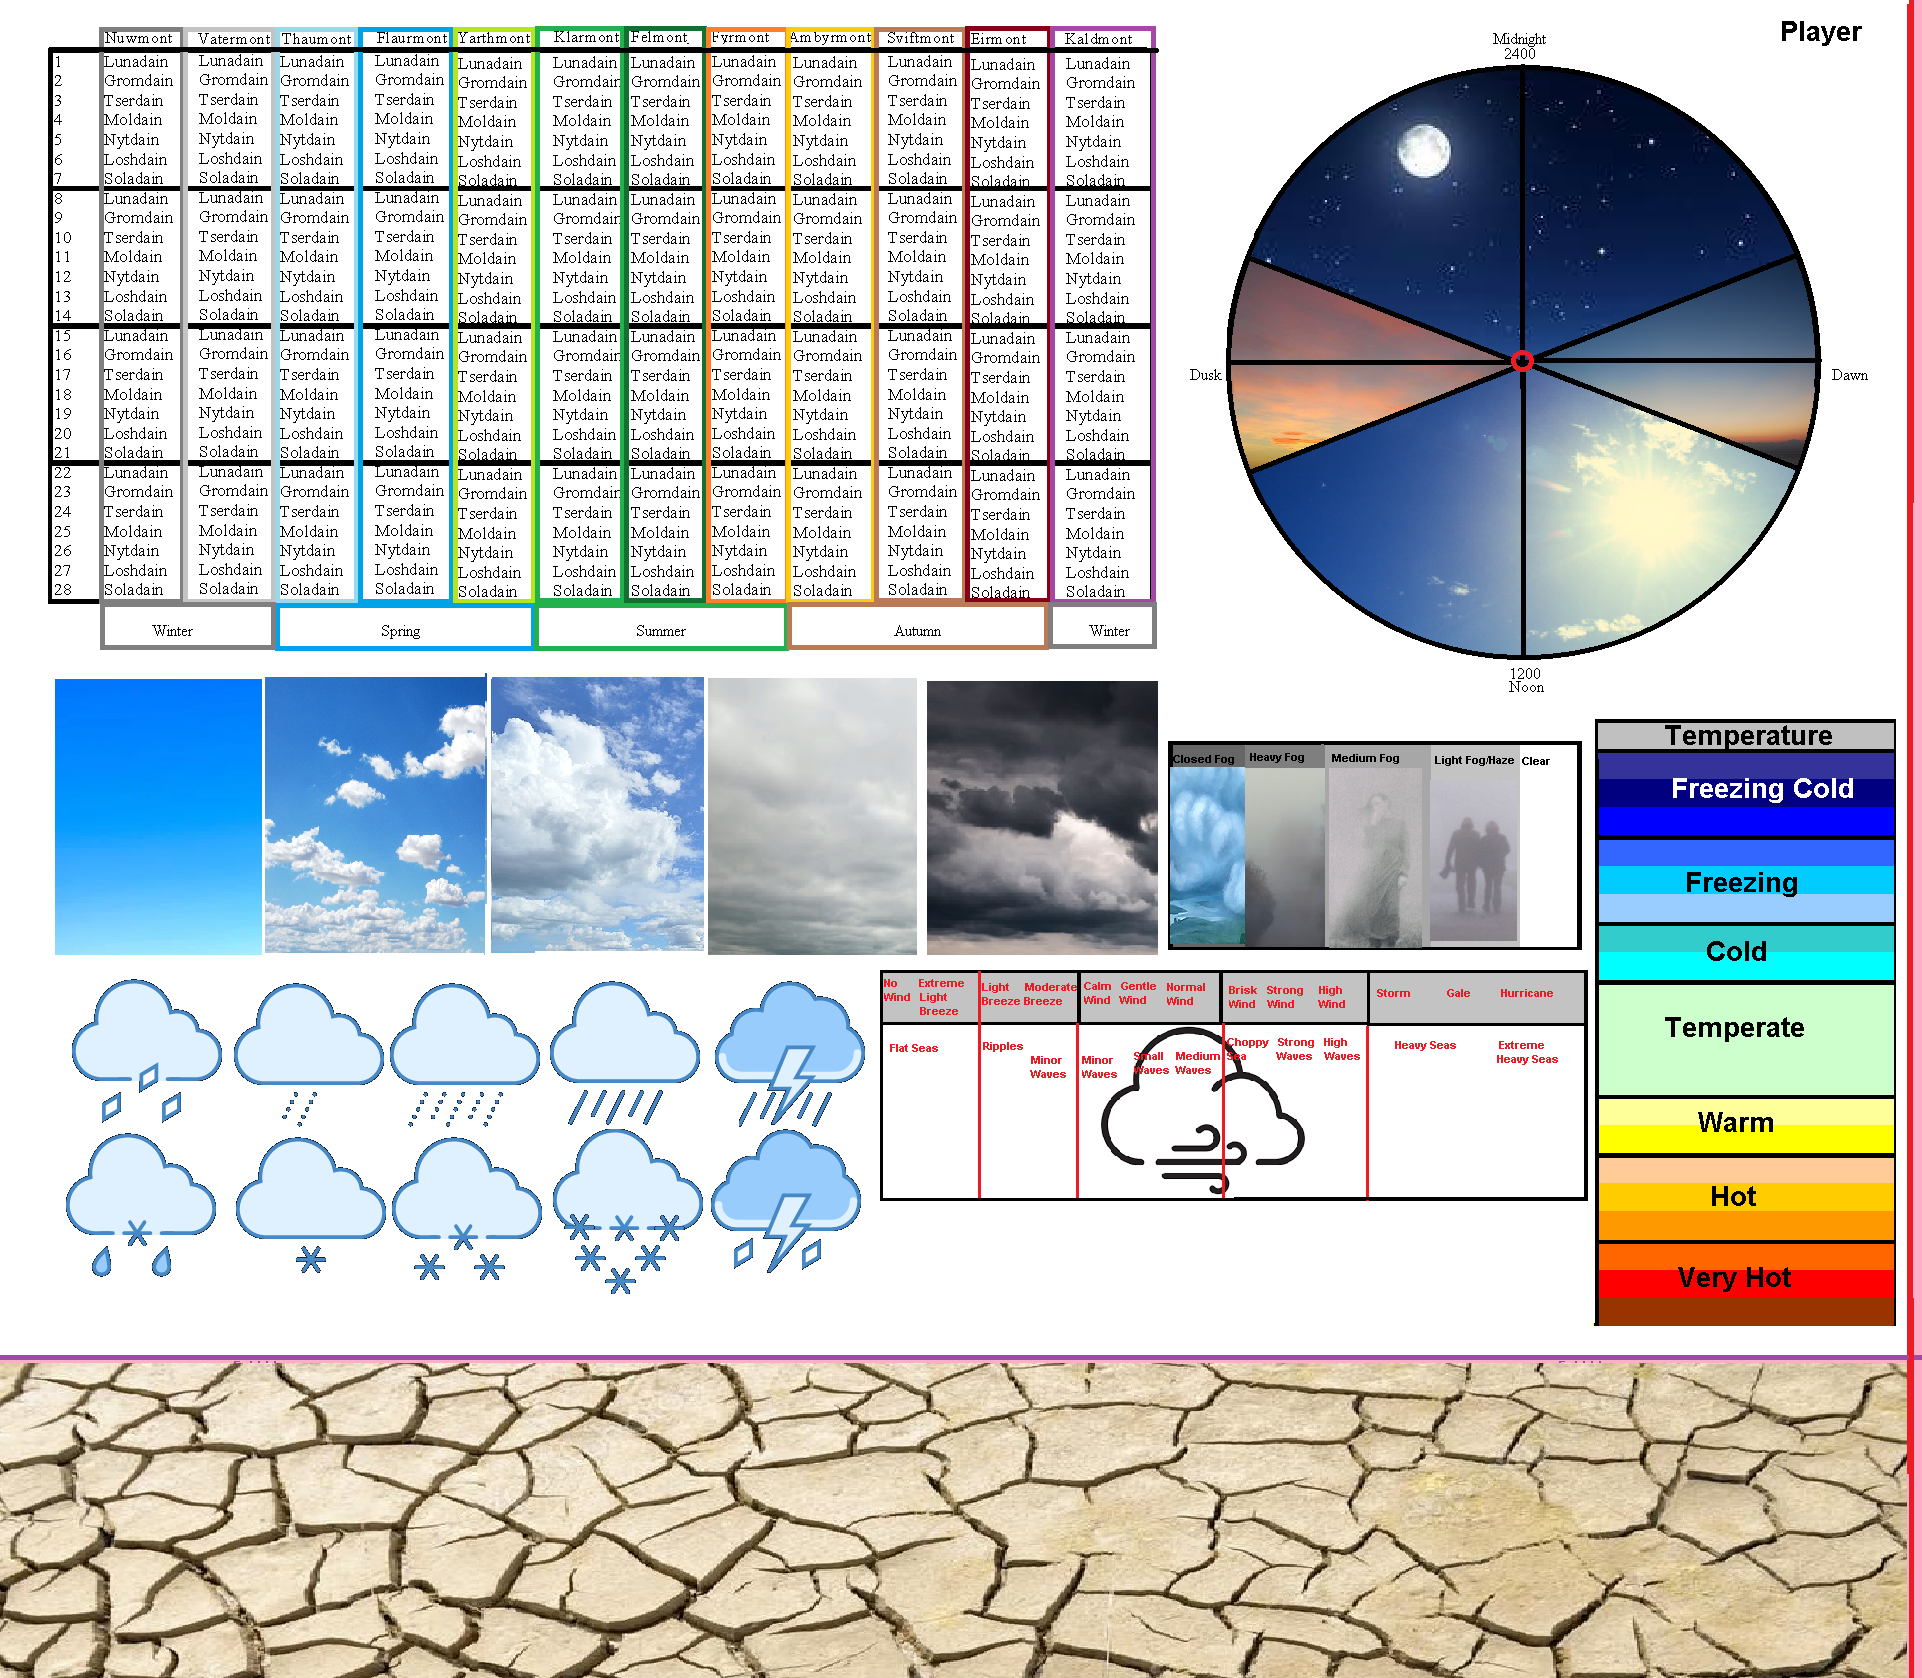
The Mystara DM/Player Weather-Time Screen
I created a DM weather screen usable for both the players to see current circumstances, and the DM with used statistical changes. As in normal life you don't actually know the stregth of the wind, the temperature, or even the time, the information for the players is limited. Yet at the same time you will know the general season, time of day, and day of the month, the general cloudiness, fogginess, and precipitation, and even general temperature, windstrength. this device helps the players getting this information, and gives the DM all other information at the same time.
First read any here carefully before construction
What do you need;
1 printer able to print A3 size
2 scissor or cutting knife & board
3 1 metal eyelet diameter 2 or 3 mm (or clock eyelet)
4 1 piece of strong metal wire thickness 2 or 3 mm (as eyelet) length.... or the two dials of a cheap disc clock or similar
5 White Glue or glue stick---if you intend to plasticize the screens other glue might be better as you glue plastic against eachother, yet apply in care(fresh air) and thinly, to prevent warping.
6 Four pieces A3 white
7 A piece of A3 cardboard (thick enough to provide vertical stability when in use) This step can be ignored if using the plasticizing method
8 long beaked thin thong
9 six sets of small magnets (+ and -) (1x set of 2, 3 or 5mm diameter, 5x sets of 1cm diameter) see here
10 some thin cloth to enable smooth glide/use
11 a thin needle
How to create this handy game item:
1 Print both the PC and DM pictures, each on an A3 paper both at the same equal printing size, so the red line will become the edge of player side right, DMside left.
2 Carefully trim away all exes along the Red Line.
3 Fold the lower purple line inward on both screen prints. (The fold moves away from you)
4 Print the sides picture at the same equal printing size. do so twice.
5 This step is not required to be functional, yet reduces wear and tear over time. Plasticize both DM and PC screen, as well as the two printed versions of the sides. If you do so you will not requite a cardboard for stability... If you do not plasticize then cut the one cardboard to the same size as the screens, without the forward folded area of these screens. (only the main picture).
6 Cut away all the pink on the side pieces, carefully along the blacklines. You will have now 2 innerside left, 2 innerside right, 2 side pieces, and a brown bottom piece.
7 Fold the innerside pieces inward along their purple lines. (The fold moves away from you)
8 Carefully glue the Innerside Left, and the Innerside right at their corresponding positions on both the DM and the PC sheet. You will end up with two screens with slanted sides with weather pictures facing you similar as the screen.
9 Glue the yellow areas of the side pieces underneath the forward area of your DM sheet. (no yellow should be visible, and the screens become 3D now) repeat for the remaining PC sheet (they will look similar in shape now)
10 Pierce the Red dot in the middle of the clock with a needle on both screens
11 Glue the DM screen to the cardboard.Pierce the the red centre of the clock again.
12 Carefully align the PC screen to the cardboard so the red line on both screens and the red pierced centre of both the clocks match. Then glue. Keep this alignment intact, this is important. If you fail this step start anew, sorry this is very important.
13 You will now have a two sided screen with slanted stabilizing sides.
14 Glue the triangular side pieces on the exposed sides, so the Lightningbolts are on the outer side of the structure.. Fold the purple line either inward and leave the yellow section as extra stability, or fold it forward glueing the piece onder the whole structure.
15 Glue the Brown bottom piece on thebottom of the construction (brown side down)
The following steps depend if you want to use the"wire" W technique or the 'dials" D technique
D16 carefully remove the two dials of the clock, and seperate these. Also remove the eyelet these dials used. you can toss the rest away in the recycle bin or use for whatever you desire elsewhere)
W16 Use the Thong to bend the strong metal wire in a 90degree angle. The length of each side should be about the diameter of the Screen clock.
WD17 Pierce the center of the screen clock so the 2-3mm eyelet can be placed (or the original clock's eyelet if using this method)
D18 Place one dial on each side of the screen, through the original clock's eyelet. Place these so they fit tightly in the eyelet and does not shift easily.Also align both dials so they both point to 12:00 before glueig these to eachother with a tiny drop of glue. BE careful not to glue the dials to the original clock's eyelet, only glue the dials on eachother so they will never shift.
W18 Pierce the strong metal wire through the eyelet. This has to fit thus tight it will not move freely. If it does use a thicker wire os smaller eyelet. Use the Thong to bend the strong metal wire in another 90degree angle only a few mm from the former bend, thus forming a "U" shap. The length of each side should be about equal to eachother and the diameter of the Screen clock. This will form the dials of the clock.
19 Get the magnets, set these in attracting pairs of equal size, and glue some thing cloth to their attracting sides. The ones on the DM side can be made more functional by glueing a screw on the mmagnet, so the magnet can be moved more easily. Now you can click these on each side of the screen, One on the Cloudcover, Temperature, Fog, Precipitation and Wind tables. Use the tiny magnets on the calender table.
20 Now the DM can move these magnets as indicators of said weathertype and date. The DM will see all game relted information of these while the PC's will only see a very limited information, suitable to them.
KEEP IN MIND that the DM side the calender goes from right to left and the clock goes counter clockwise. This is to allow the PC to see everything as normal while the DM relays the information by using the dials and magnets.
and yes, the clock has only one dial on each side of the screen, no half hours and such, just a general time positionb in relation between sunrise , noon, and sunset and midnight, depending on the season and location even these will differ, yet this way the same screen can be used
Have fun
Let your PC's roam in the Rain, Thunderstorm, Snow or Sun.
With all its nastyness for PC's and NPC's alike